Overview of some often used Oracle 10g/11g/12c SQL Statements
Version : 3.6
Date : 30 November 2016
By : Albert van der Sel
Remark : Please refresh the page to see any updates.
It may take a few seconds to load this html page...
This note is organized in 2 parts:
Part 1: 10g/11g Statements (practically all will work in 12c as well)
Part 2: Specific 12c Statements
Part 1 was created while 10g and 11g were still courant versions of the RDBMS.
However, since 12c is availble, the note had to be extended with additional 12c specifics. Hence Part 2.
Part 1:
Main Contents Part 1: 10g/11g
1. ENABLE AND DISABLE A CONSTRAINT
2. DISABLE AND ENABLE TRIGGER
3. PROCESSES AND LOCKS
4. QUICK CHECK DATABASE NAME AND INSTANCE NAME
5. QUICK CHECK ON DATABASE FILES
6. QUICK CHECK ON BACKUP/RECOVERY RELATED EVENTS
7. EXAMPLES OF SOME COMMON CREATE STATEMENTS
8. GET THE SQL ISSUED AGAINST THE DATABASE
9. GET THE SGA PROPERTIES
10. CREATE AN "SPFILE.ORA" FROM AN "INIT.ORA" AND THE OTHER WAY AROUND
11. CREATE A COPY TABLE WITH ALL DATA
12. A FEW SIMPLE WAYS TO TRACE A SESSION
13. A FEW SIMPLE WAYS TO DETECT WAITS
14. CREATE A DATABASE USER
15. FINDING INVALID OBJECTS AND REPAIR
16. CREATING AND REBUILDING INDEXES
17. GETTING PRODUCT/PARAMETER INFORMATION
18. KILLING AN ORACLE SESSION
19. 9i,10g,11g INIT.ORA/SPFILE.ORA initialization parameters
20. DIAGNOSTIC TOOLS IN 9i: A FEW WORDS ON STATSPACK
21. USING A CURSOR IN PL/SQL LOOPS
22. EXECUTING SCRIPTS FROM THE "SQL>" PROMPT
23. USING CONTROLS, AND "FOR.." AND "WHILE.." LOOPS IN PL/SQL
24. HOW TO PUT SQLPLUS OUTPUT IN A SHELL VARIABLE
25. INSTANCE STARTUP OPTIONS
26. A FEW 10g,11g RMAN NOTES
27. HOW TO VIEW IF THE DATABASE IS DOING A LARGE ROLLBACK
28. A SIMPLE WAY TO CLONE A 9i/10g/11g DATABASE
29. A FEW NOTES ON 10g/11g ADDM and AWR
30. A FEW connect STRING EXAMPLES
31. UNSTRUCTURED PLSQL txt FILE
32. HOW TO SOLVE BLOCK CORRUPTION
33. BIRDS-EYE VIEW ON INSTANCE STRUCTURE AND PROCESSES.
34. Appendices.
Part 2:
Main Contents Part 2: 12c (and some also applies to 10g/11g)
35. EM CLOUD CONTROL 12c or EM EXPRESS 12c.
36. CDB AND PDB's IN 12c.
37. CLONING A DATABASE IN 12c.
38. FULL DATABASE CACHING IN 12c.
39. CREATE DATABASE USER IN 12c.
40. ASM IN 10g/11g AND 12c.
41. RMAN IN 12c (SEE ALSO SECTION 26 FOR 10g/11g).
42. ADR, LOGFILES, DIAGNOSTICS (11g/12c).
43. MOVING DATABASE FILES.
44. DATAGUARD 11g/12c.
45. SHOW OFTEN ACCESSED TABLES AND INDEXES (10g/11g/12c).
46. SHOW PERMISSIONS AND GRANT STATEMENTS (10g/11g/12c).
47. EXPDP AND IMPDP (10g/11g/12c).
1. ENABLE AND DISABLE A CONSTRAINT:
-- Disable and enable one Constraint:
ALTER TABLE table_name enable CONSTRAINT constraint_name;
ALTER TABLE table_name disable CONSTRAINT constraint_name;
-- Make a list of statements: Disable and enable ALL Foreign Key (type=R) constraints in one schema (like e.g. HARRY):
SELECT 'ALTER TABLE HARRY.'||table_name||' enable constraint '||constraint_name||';'
FROM DBA_CONSTRAINTS
WHERE owner='HARRY' AND constraint_type='R';
SELECT 'ALTER TABLE HARRY.'||table_name||' disable constraint '||constraint_name||';'
FROM DBA_CONSTRAINTS
WHERE owner='HARRY' AND constraint_type='R';
More on "dynamic" statements:
The statements you see above, generate listings of actual statements.
This will help you if you must alter a large list of objects, or if you must grant or revoke permissions etc.. etc..
Here are a few other examples:
-- create synonyms:
select 'create or replace public synonym '||table_name||'for HR.'||table_name||';'
from dba_tables where owner='HR';
-- INDEX rebuild:
SELECT 'alter index ALBERT.'||INDEX_NAME||' rebuild;'
from dba_indexes where owner='ALBERT';
-- Granting permissions to a role or user for a set of objects:
SELECT 'GRANT SELECT ON HR.'||table_name||' TO ROLE_READONLY;' from dba_tables
where owner='HR';
SELECT 'GRANT SELECT ON HR.'||view_name||' TO ROLE_READONLY;' from dba_views
where owner='HR';
SELECT 'GRANT SELECT, INSERT, UPDATE, DELETE ON NiceApp.'||table_name||' TO Albert;' from dba_tables
where owner='NiceApp';
2. DISABLE AND ENABLE TRIGGER:
-- Disable and enable one trigger:
ALTER TRIGGER trigger_name DISABLE;
ALTER TRIGGER trigger_name ENABLE;
-- Or in 1 time for all triggers on a table:
ALTER TABLE table_name DISABLE ALL TRIGGERS;
ALTER TABLE table_name ENABLE ALL TRIGGERS;
-- Drop a trigger:
DROP TRIGGER trigger_name;
3. PROCESSES AND LOCKS:
3.1 QUICK CHECK ON PROCESSES:
set linesize=1000
set pagesize=1000
-- v$session mainly shows characteristics of Oracle Sessions, v$process is more oriented
-- to OS processes.
-- The below two (similar) queries "connects" the Oracle Session ID (sid) to the OS process (spid):
SELECT
p.spid AS OS_PID,
p.pid,
s.sid AS ORACLE_SID,
p.addr,s.paddr,
substr(s.username, 1, 15) AS DBUSER,
substr(s.schemaname, 1, 15),
s.command,
substr(s.osuser, 1, 15) AS OSUSER,
substr(s.machine, 1, 15) AS MACHINE,
substr(s.program,1,15) AS PROGRAM
FROM v$session s, v$process p
WHERE s.paddr=p.addr
SELECT
p.spid AS OS_PID,
s.sid AS ORACLE_SID,
substr(s.osuser, 1, 15) AS OSUSER,
substr(s.program,1,55) AS PROGRAM,
substr(s.module,1,55) AS MODULE
FROM v$session s, v$process p
WHERE s.paddr=p.addr;
-- Short version:
select p.spid, s.sid, s.osuser, s.program from
v$process p, v$session s where p.addr=s.paddr;
-- Listing characteristics of Oracle Sessions (v$session):
SELECT
sid, serial#, substr(username,1,15), substr(osuser,1,15), LOCKWAIT, substr(program,1,30), substr(module,1,30)
FROM v$session;
SELECT
sid, serial#, command,substr(username, 1, 15), substr(osuser,1,15), sql_address,LOCKWAIT,
to_char(logon_time, 'DD-MM-YYYY;HH24:MI'), substr(program, 1, 30)
FROM v$session;
-- background processes:
SQL> SELECT paddr, name, substr(description,1,40) FROM v$bgprocess;
SQL> SELECT pid, spid, program, background FROM v$process WHERE BACKGROUND=1;
3.2 QUICK CHECK ON LOCKS:
SELECT d.OBJECT_ID, substr(OBJECT_NAME,1,20), l.SESSION_ID, l.ORACLE_USERNAME, l.LOCKED_MODE
FROM v$locked_object l, dba_objects d
WHERE d.OBJECT_ID=l.OBJECT_ID;
SELECT * FROM DBA_WAITERS;
SELECT waiting_session, holding_session, lock_type, mode_held
FROM dba_waiters;
3.3 QUICK CHECK ON TEMP:
select total_extents, used_extents, total_extents, current_users, tablespace_name
from v$sort_segment;
select username, user, sqladdr, extents, tablespace from v$sort_usage;
3.4 QUICK CHECK ON ACTIVITY UNDO:
SELECT a.sid, a.saddr, b.ses_addr, a.username, b.xidusn, b.used_urec, b.used_ublk
FROM v$session a, v$transaction b
WHERE a.saddr = b.ses_addr;
3.5 QUICK CHECK ON CPU USAGE
select ss.username, se.SID, se.SERIAL#, VALUE/100 cpu_usage_seconds
from v$session ss, v$sesstat se, v$statname sn
where
se.STATISTIC# = sn.STATISTIC#
and
NAME like '%CPU used by this session%'
and
se.SID = ss.SID
and
ss.status='ACTIVE'
and
ss.username is not null
order by VALUE desc;
select v.sql_text, v.FIRST_LOAD_TIME, v.PARSING_SCHEMA_ID, v.DISK_READS, v.ROWS_PROCESSED, v.CPU_TIME,
b.username from
v$sqlarea v, dba_users b
where v.FIRST_LOAD_TIME > '2017-06-26'
and v.PARSING_SCHEMA_ID=b.user_id
order by v.CPU_TIME desc ;
4. QUICK CHECK DATABASE NAME AND INSTANCE NAME:
set linesize=1000
set pagesize=1000
SELECT * FROM v$database;
SELECT DBID, NAME, CREATED, LOG_MODE, OPEN_MODE FROM v$database;
SELECT * FROM v$instance;
SELECT INSTANCE_NAME, HOST_NAME,VERSION, STARTUP_TIME, STATUS FROM v$instance;
5. QUICK CHECKS ON DATABASE FILES:
5.1 CONTROLFILES:
select * from v$controlfile;
5.2 REDO LOG FILES:
select * from v$log;
select * from v$logfile;
5.3 DATA FILES:
SELECT file_id, substr(file_name, 1, 70), substr(tablespace_name,1,50), status FROM dba_data_files;
SELECT file_id, substr(file_name, 1, 70), bytes, blocks, autoextensible FROM dba_data_files;
SELECT file#, status, substr(name, 1, 70) FROM V$DATAFILE;
5.4 FREE/USED SPACE IN TABLESPACES:
SELECT Total.name "Tablespace Name",
Free_space, (total_space-Free_space) Used_space, total_space
FROM
(SELECT tablespace_name, sum(bytes/1024/1024) Free_Space
FROM sys.dba_free_space
GROUP BY tablespace_name
) Free,
(SELECT b.name, sum(bytes/1024/1024) TOTAL_SPACE
FROM sys.v_$datafile a, sys.v_$tablespace B
WHERE a.ts# = b.ts#
GROUP BY b.name
) Total
WHERE Free.Tablespace_name = Total.name;
6. QUICK CHECK ON BACKUP/RECOVERY RELATED EVENTS:
SELECT * FROM v$backup;
SELECT file#, status, substr(name, 1, 70), checkpoint_change# FROM v$datafile;
SELECT file#, status, checkpoint_change# FROM v$datafile_header;
SELECT substr(name,1,60), recover, fuzzy, checkpoint_change#, resetlogs_change#, resetlogs_time
FROM v$datafile_header;
SELECT name, open_mode, checkpoint_change#, ARCHIVE_CHANGE# FROM v$database;
SELECT GROUP#,THREAD#,SEQUENCE#,MEMBERS,ARCHIVED,STATUS,FIRST_CHANGE# FROM v$log;
SELECT GROUP#,substr(member,1,70) FROM v$logfile;
SELECT * FROM v$log_history;
SELECT * FROM v$recover_file;
SELECT * FROM v$recovery_log;
SELECT first_change#, next_change#, sequence#, archived, substr(name, 1, 50)
FROM V$ARCHIVED_LOG;
SELECT status,resetlogs_change#,resetlogs_time,checkpoint_change#,
to_char(checkpoint_time, 'DD-MON-YYYY HH24:MI:SS') as checkpoint_time,count(*)
FROM v$datafile_header
group by status, resetlogs_change#, resetlogs_time, checkpoint_change#, checkpoint_time
order by status, checkpoint_change#, checkpoint_time ;
SELECT LF.member, L.group#, L.thread#, L.sequence#, L.status,
L.first_change#, L.first_time, DF.min_checkpoint_change#
FROM v$log L, v$logfile LF,
(select min(checkpoint_change#) min_checkpoint_change#
from v$datafile_header
where status='ONLINE') DF
WHERE LF.group# = L.group#
AND L.first_change# >= DF.min_checkpoint_change#;
SELECT * FROM V$RECOVERY_FILE_DEST;
SELECT * FROM V$FLASH_RECOVERY_AREA_USAGE;
SELECT V1.GROUP#, MEMBER, SEQUENCE#, FIRST_CHANGE#
FROM V$LOG V1, V$LOGFILE V2
WHERE V1.GROUP# = V2.GROUP# ;
SELECT FILE#, CHANGE# FROM V$RECOVER_FILE;
select al.sequence#
from v$archived_log al, v$log rl
where al.sequence# = rl.sequence# (+)
and al.thread# = rl.thread# (+)
and ( rl.status = 'INACTIVE'
or rl.status is null
)
and al.deleted = 'NO'
order by al.sequence#
SELECT RECOVERY_ESTIMATED_IOS FROM V$INSTANCE_RECOVERY;
7. EXAMPLES OF SOME COMMON CREATE STATEMENTS :
7.1 CREATE TABLESPACE:
CREATE TABLESPACE STAGING DATAFILE 'C:\ORADATA\TEST11G\STAGING.DBF' SIZE 5000M
EXTENT MANAGEMENT LOCAL AUTOALLOCATE
SEGMENT SPACE MANAGEMENT AUTO;
CREATE TABLESPACE CISTS_01 DATAFILE '/u07/oradata/spldevp/cists_01.dbf' SIZE 1200M
EXTENT MANAGEMENT LOCAL UNIFORM SIZE 128K;
7.2 CREATE TABLE (heap organized):
CREATE TABLE employees
(
employee_id NUMBER(6),
first_name VARCHAR2(20),
last_name VARCHAR2(25) NOT NULL,
email VARCHAR2(25) NOT NULL,
phone_number VARCHAR2(20),
hire_date DATE CONSTRAINT emp_hire_date_nn NOT NULL,
job_id VARCHAR2(10) CONSTRAINT emp_job_nn NOT NULL,
salary NUMBER(8,2),
commission_pct NUMBER(2,2),
manager_id NUMBER(6),
department_id NUMBER(4),
CONSTRAINT emp_salary_min CHECK (salary > 0),
CONSTRAINT emp_email_uk UNIQUE (email)
) TABLESPACE USERS;
ALTER TABLE employees
ADD (
CONSTRAINT emp_emp_id_pk PRIMARY KEY (employee_id),
CONSTRAINT emp_dept_fk FOREIGN KEY (department_id) REFERENCES departments (department_id),
CONSTRAINT emp_job_fk FOREIGN KEY (job_id) REFERENCES jobs (job_id),
CONSTRAINT emp_manager_fk FOREIGN KEY (manager_id) REFERENCES employees (manager_id)
) ;
CREATE TABLE hr.admin_emp (
empno NUMBER(5) PRIMARY KEY,
ename VARCHAR2(15) NOT NULL,
ssn NUMBER(9) ENCRYPT,
job VARCHAR2(10),
mgr NUMBER(5),
hiredate DATE DEFAULT (sysdate),
photo BLOB,
sal NUMBER(7,2),
hrly_rate NUMBER(7,2) GENERATED ALWAYS AS (sal/2080),
comm NUMBER(7,2),
deptno NUMBER(3) NOT NULL,
CONSTRAINT admin_dept_fkey REFERENCES hr.departments
(department_id))
TABLESPACE admin_tbs
STORAGE ( INITIAL 50K);
7.3 OBJECT TABLE:
CREATE TYPE department_typ AS OBJECT
( d_name VARCHAR2(100),
d_address VARCHAR2(200) );
CREATE TABLE departments_obj_t OF department_typ;
INSERT INTO departments_obj_t
VALUES ('hr', '10 Main St, Sometown, CA');
7.4 GLOBAL TEMPORARY TABLE:
CREATE GLOBAL TEMPORARY TABLE my_temp_table (
column1 NUMBER,
column2 NUMBER
) ON COMMIT DELETE ROWS;
CREATE GLOBAL TEMPORARY TABLE my_temp_table (
column1 NUMBER,
column2 NUMBER
) ON COMMIT PRESERVE ROWS;
7.5 EXTERNAL TABLE:
CREATE OR REPLACE DIRECTORY ext AS 'c:\external';
GRANT READ ON DIRECTORY ext TO public;
CREATE TABLE ext_tab (
empno CHAR(4),
ename CHAR(20),
job CHAR(20),
deptno CHAR(2))
ORGANIZATION EXTERNAL (
TYPE oracle_loader
DEFAULT DIRECTORY ext
ACCESS PARAMETERS (
RECORDS DELIMITED BY NEWLINE
BADFILE 'bad_%a_%p.bad'
LOGFILE 'log_%a_%p.log'
FIELDS TERMINATED BY ','
MISSING FIELD VALUES ARE NULL
REJECT ROWS WITH ALL NULL FIELDS
(empno, ename, job, deptno))
LOCATION ('demo1.dat')
)
7.6 CREATE CLUSTER:
Index Cluster:
CREATE CLUSTER employees_departments_cluster
(department_id NUMBER(4))
SIZE 512;
CREATE INDEX idx_emp_dept_cluster ON CLUSTER employees_departments_cluster;
-- Now, "add" tables to the cluster like for example:
CREATE TABLE employees ( ... )
CLUSTER employees_departments_cluster (department_id);
CREATE TABLE departments ( ... )
CLUSTER employees_departments_cluster (department_id);
7.7 INDEX-ORGANIZED TABLE:
-- Index Organized Tables are tables that, unlike heap tables, are organized like B*Tree indexes.
CREATE TABLE labor_hour (
WORK_DATE DATE,
EMPLOYEE_NO VARCHAR2(8),
CONSTRAINT pk_labor_hour
PRIMARY KEY (work_date, employee_no))
ORGANIZATION INDEX;
7.8 DATABASE LINK:
-- To run queries against remote tables in another database, you can create a "database link":
-- Example:
CREATE Public Database Link MYLINK
connect To scott Identified By tiger using sales;
Here, "sales" is the alias as listed in the tnsnames.ora, which corresponds to some local
or remote instance.
Also, scott is a schema in that remote database, which owns the tables and views we are
interrested in.
Now suppose that EMP (scott.EMP) is a table in the remote database, then we can query it using
a syntax like:
SELECT * from EMP@MYLINK;
So, the SELECT statement simply uses identifiers like "OBJECT_NAME@DATABASELINK_NAME"
in the FROM clause.
Note: you can also create a "synonym" for such remote tables, which make them
to "appear" to exist locally.
7.9 SEQUENCE:
CREATE SEQUENCE sequence name
INCREMENT BY increment number
START WITH start number
MAXVALUE maximum value
CYCLE ;
CREATE SEQUENCE SEQ_SOURCE
INCREMENT BY 1
START WITH 1
MAXVALUE 9999999
NOCYCLE;
create table SOURCE
(
id number(10) not null,
longrecord varchar2(128));
CREATE OR REPLACE TRIGGER tr_source
BEFORE INSERT ON SOURCE FOR EACH ROW
BEGIN
SELECT seq_source.NEXTVAL INTO :NEW.id FROM dual;
END;
/
7.10 Partitioned Table:
-- RANGE PARTITIONED:
CREATE TABLE sales
( invoice_no NUMBER,
sale_year INT NOT NULL,
sale_month INT NOT NULL,
sale_day INT NOT NULL )
PARTITION BY RANGE (sale_year, sale_month, sale_day)
( PARTITION sales_q1 VALUES LESS THAN (1999, 04, 01)
TABLESPACE tsa,
PARTITION sales_q2 VALUES LESS THAN (1999, 07, 01)
TABLESPACE tsb,
PARTITION sales_q3 VALUES LESS THAN (1999, 10, 01)
TABLESPACE tsc,
PARTITION sales_q4 VALUES LESS THAN (2000, 01, 01)
TABLESPACE tsd );
-- A row with SALE_YEAR=1999, SALE_MONTH=8, and SALE_DAY=1 has a partitioning key of (1999, 8, 1)
-- and would be stored in partition SALES_Q3 in Tablespace tsc.
-- HASH PARTITIONED:
CREATE TABLE scubagear
(id NUMBER,
name VARCHAR2 (60))
PARTITION BY HASH (id)
PARTITIONS 4
STORE IN (gear1, gear2, gear3, gear4);
-- LIST PARTITIONED:
CREATE TABLE q1_sales_by_region
(deptno number,
deptname varchar2(20),
quarterly_sales number(10, 2),
state varchar2(2))
PARTITION BY LIST (state)
(PARTITION q1_northwest VALUES ('OR', 'WA'),
PARTITION q1_southwest VALUES ('AZ', 'UT', 'NM'),
PARTITION q1_northeast VALUES ('NY', 'VM', 'NJ'),
PARTITION q1_southeast VALUES ('FL', 'GA'),
PARTITION q1_northcentral VALUES ('SD', 'WI'),
PARTITION q1_southcentral VALUES ('OK', 'TX'));
-- Composite Range-Hash Partitioning:
CREATE TABLE scubagear (equipno NUMBER, equipname VARCHAR(32), price NUMBER)
PARTITION BY RANGE (equipno) SUBPARTITION BY HASH(equipname)
SUBPARTITIONS 8 STORE IN (ts1, ts2, ts3, ts4) -- tablespaces
(PARTITION p1 VALUES LESS THAN (1000),
PARTITION p2 VALUES LESS THAN (2000),
PARTITION p3 VALUES LESS THAN (MAXVALUE));
8. GET THE SQL ISSUED AGAINST THE DATABASE:
-- Could take a lot of performance, depending on uptime and activity.
-- Sort of auditing. You get the sql statements.
-- Important: First try this query on a test system.
-- set linesize 70
-- set pagesize 100
-- set trimspool on
-- spool /tmp/sql.log
select v.sql_text, v.FIRST_LOAD_TIME, v.PARSING_SCHEMA_ID, v.DISK_READS, v.ROWS_PROCESSED, v.CPU_TIME,
b.username from
v$sqlarea v, dba_users b
where v.FIRST_LOAD_TIME > '2010-03-15'
and v.PARSING_SCHEMA_ID=b.user_id
order by v.FIRST_LOAD_TIME ;
9. GET THE SGA PROPERTIES:
-- Oracle background processes:
SQL> SELECT paddr, name, substr(description,1,40) FROM v$bgprocess;
SQL> SELECT pid, spid, program, background FROM v$process WHERE BACKGROUND=1;
-- All processes:
SQL> SELECT SID,SERIAL#,USERNAME,COMMAND,PROCESS,MODULE,PROGRAM FROM v$session;
-- SGA properties:
SELECT * FROM v$sga;
SELECT * FROM v$sgastat;
SELECT * FROM v$pgastat; -- PGA properties
SELECT * FROM v$memory_target_advice ORDER BY memory_size;
SELECT SUBSTR(COMPONENT,1,20), CURRENT_SIZE, MIN_SIZE, MAX_SIZE, USER_SPECIFIED_SIZE from V$MEMORY_DYNAMIC_COMPONENTS;
SELECT sum(bytes) FROM v$sgastat WHERE pool in ('shared pool', 'java pool', 'large pool');
SELECT (1-(pr.value/(dbg.value+cg.value)))*100
FROM v$sysstat pr, v$sysstat dbg, v$sysstat cg
WHERE pr.name = 'physical reads'
AND dbg.name = 'db block gets'
AND cg.name = 'consistent gets';
SELECT * FROM v$sgastat
WHERE name = 'free memory';
SELECT gethits,gets,gethitratio FROM v$librarycache
WHERE namespace = 'SQL AREA';
SELECT substr(sql_text,1,40) "SQL",
count(*) ,
sum(executions) "TotExecs"
FROM v$sqlarea
WHERE executions < 5
GROUP BY substr(sql_text,1,40)
HAVING count(*) > 30
ORDER BY 2;
SELECT SUM(PINS) "EXECUTIONS", SUM(RELOADS) "CACHE MISSES WHILE EXECUTING"
FROM V$LIBRARYCACHE;
See also section 33 for an illustration of the memory structures and processes.
10. CREATE AN "SPFILE.ORA" FROM AN "INIT.ORA" AND THE OTHER WAY AROUND:
-- init.ora: traditional ascii format startup configuration file.
-- spfile.ora: binary format startup configuration file.
-- Both can be used to start the instance. However, preferred is to use the spfile.ora.
-- The actual (default) init.ora/spfile.ora file, will use the instance name in it's filename, like initSALES.ora
CREATE SPFILE='/opt/oracle/product/10.2/dbs/spfileSALES.ora'
FROM PFILE='/opt/oracle/product/10.2/admin/scripts/init.ora';
CREATE SPFILE='/opt/app/oracle/product/9.2/dbs/spfilePEGACC.ora'
FROM PFILE='/opt/app/oracle/admin/PEGACC/scripts/init.ora';
CREATE PFILE='/opt/oracle/product/10.2/admin/scripts/init.ora'
FROM SPFILE='/opt/oracle/product/10.2/dbs/spfileSALES.ora';
In addition, in Oracle 11g, you can create a pfile (init.ora) file, just from the current settings from memory:
CREATE PFILE='/apps/oracle/product/11.1/dbs/init_prod.ora' FROM MEMORY;
11. CREATE A COPY TABLE WITH ALL DATA:
-- The CTAS method or "CREATE TABLE AS SELECT" method, allows you to create an exact copy table
-- from an original table, with the same columns and datatypes, and all rows,
-- but excluding the indexes and constraints.
-- This new table will be created "on the fly", so it should not exist beforehand.
-- Example CTAS method:
CREATE TABLE EMPLOYEE2
AS SELECT * FROM EMPLOYEE;
-- One alternative method is:
-- Obtain the create script of the original table (e.g. using toad).
-- Create the new empty table using an other tablename, using that script.
-- Then use:
INSERT INTO NEW_TABLE
SELECT * FROM SOURCE_TABLE;
12. A FEW SIMPLE WAYS TO TRACE A SESSION:
-- This section ONLY lists the very very basics on tracing.
-- "Old fashion" traces in 9i/10g/11g, uses the Session Identifier (SID) and optionally other parameters like
-- the Serial number (serial#), to distinguish between all sessions in the database, and accordingly trace
-- that specific session.
-- Modern methods allows you to establish a client identifier, or let's you monitor on a module,
-- so you are not perse "tied" to the SID anymore.
-- From v$session you can find the username, osuser, SID, SERIAL#, program, and module (if needed).
-- Like for example (see section 3 for more info):
--
-- select sid, serial#, username from v$session;
-- select sid, serial#, username, module from v$session;
--
-- This will identify the Oracle SID with the username (and optionally the OS user and other).
-- If you know a characteristic program, or module (like sqlplus), or user, the SID (Session ID) can be found.
-- Especially the "module" field in v$session identifies a certain client program like "sqlplus.exe" or "nav.exe" etc..
-- But maybe, already a unique username is sufficient to identify the SID and SERIAL# in your situation.
-- In most methods, the 9i, 10g traces will be stored in the USER_DUMP_DEST directory (udump).
12.1 TRACING ON SESSION ID (SID)
1. Using the DBMS_MONITOR.SESSION_TRACE_ENABLE() procedure:
Example: Suppose you want to trace Session 75 with serial# 4421:
exec DBMS_MONITOR.SESSION_TRACE_ENABLE(75,4421);
To disable tracing specified in the previous step:
exec DBMS_MONITOR.SESSION_TRACE_DISABLE(75,4421);
Since almost always the session is qualified "enough" by the SID alone, you can use this as well:
exec DBMS_MONITOR.SESSION_TRACE_ENABLE(75);
Tracing your session can be done using:
exec DBMS_MONITOR.SESSION_TRACE_ENABLE();
or
exec DBMS_MONITOR.SESSION_TRACE_ENABLE(NULL, NULL);
2. Using the DBMS_SYSTEM.SET_EV() procedure:
Here, You need to know which "event" number you want to trace on, and the level thereoff.
For a performance related trace, event 10046 with level 8 (or 12) might be a good choice.
Be aware that these traces produce quick growing trace files (especially level 12).
Next, you need the SID and SERIAL# of the session you want to trace.
The trace information will be written to user_dump_dest.
Example:
Start the trace on Session 177 (with serial# 55235):
exec sys.dbms_system.set_ev(177,55235,10046,8,'');
Stop the trace on Session 177 (with serial# 55235):
exec sys.dbms_system.set_ev(177,55235,10046,0,'');
3. Using the DBMS_System.Set_Sql_Trace_In_Session() procedure:
A "quite old" and well known other procedure that can be used to trace a Session, is the
DBMS_System.Set_Sql_Trace_In_Session(SID, SERIAL#,true|false) procedure.
Example:
Turn SQL tracing on in session 448. The trace information will get written to user_dump_dest.
exec dbms_system.set_sql_trace_in_session(448,2288,TRUE);
Turn SQL tracing off in session 448
exec dbms_system.set_sql_trace_in_session(448,2288,FALSE);
12.2 TRACING ON OTHER IDENTIFIERS:
Instead of tracing on a known SID, to be able to trace on other "identifiers" is a much wanted feature.
As of 10g, the tracing facility has been greatly expanded.
New v$ "views" were added, and existing v$ "views" has been expanded to facilitate the new tracing methods.
This sub section will hold for 10g/11g.
Again let's take a look at DBMS_MONITOR again.
Suppose we want to track a program that connects to a RAC cluster. Now, the discussion is not much different
in using a standallone instance. Only, you probably know that the v$ views are specific for an instance,
while the gv$ views are "global" for all the instances in RAC.
The DBMS_MONITOR.serv_mod_act_trace_enable() method allows you to set the tracing on for sessions matching a
module, action, or other usable field in gv$session (or v$session).
So, suppose we want to generate traces for all SQL*plus sessions that connect to the cluster (RACDEV1) from any instance,
we could issue the following command:
BEGIN
DBMS_MONITOR.serv_mod_act_trace_enable
(service_name => 'RACDEV1',
module_name => 'SQL*Plus',
action_name => DBMS_MONITOR.all_actions,
waits => TRUE,
binds => FALSE,
instance_name => NULL
);
END;
/
13. A FEW SIMPLE WAYS TO DETECT WAITS:
-- This section ONLY lists the very very basics on waits.
-- set linesize 1000
-- set pagesize 1000
-- see for yourself where to use substr(field,start,lenght)
13.1 HOW TO IDENTIFY THE FILES WITH HIGHEST ACTIVITY:
-- query on v$filestat, dba_data_files:
SELECT v.PHYRDS, v.PHYWRTS, d.TABLESPACE_NAME, d.FILE_NAME
FROM V$FILESTAT v, DBA_DATA_FILES d
WHERE v.FILE#=d.FILE_ID;
13.2 HOW TO IDENTIFY ACTIVITY ON CONTROLFILES:
SELECT * FROM v$system_event
WHERE event LIKE '%control%' ;
13.3 HOW TO IDENTIFY WAITS OF SESSIONS OR WITH HIGH IO:
SELECT s.SID,v.username,v.osuser,v.command,s.BLOCK_GETS,s.PHYSICAL_READS,s.BLOCK_CHANGES,substr(v.module,1,30)
FROM v$sess_io s, v$session v
where v.sid=s.sid;
SELECT SID,OPNAME,SOFAR,TOTALWORK,START_TIME,LAST_UPDATE_TIME,TIME_REMAINING,MESSAGE
FROM v$session_longops;
-- identify SID's and the objects (or file#, block#) which are involved in waits.
SELECT SID, event,p1text,p1,p2text,p2
FROM v$session_wait
WHERE event LIKE 'db file%'
AND state = 'WAITING';
-- The p1 and p2 might identify the file# and block# of the object(s).
-- Determine the object as follows: suppose you found p1=5 and p2=1178
select segment_name, segment_type
from dba_extents
where file_id = 5 and 1178 between (block_id and block_id + blocks – 1);
13.4 OVERALL WAITS:
select
event,
total_waits,
time_waited / 100,
total_timeouts,
average_wait/100
from
v$system_event
where -- list of not too interresting events
event not in (
'dispatcher timer',
'lock element cleanup',
'Null event',
'parallel query dequeue wait',
'parallel query idle wait - Slaves',
'pipe get',
'PL/SQL lock timer',
'pmon timer',
'rdbms ipc message',
'slave wait',
'smon timer',
'SQL*Net break/reset to client',
'SQL*Net message from client',
'SQL*Net message to client',
'SQL*Net more data to client',
'virtual circuit status',
'WMON goes to sleep'
);
SELECT event, total_waits, total_timeouts, time_waited, average_wait
FROM v$system_event order by time_waited;
SELECT NAME, VALUE from v$sysstat
where name like '%db%' or name like '%block%'
or name like '%log%' or name like '%cons%'
or name like '%undo%' or name like '%write%' or name like '%read%';
13.5 MORE ON V$SESSION_LONGOPS:
Long running statements are also registered in v$session_longops.
Especially cute, are fields like "sofar"(work already done), "totalwork", and ofcourse
identifiers of the session and user.
Here are some well-known examples which almost everybody uses once in a while:
Example 1:
select * from
(
select
opname,
start_time,
target,
sofar,
totalwork,
units,
elapsed_seconds,
message
from
v$session_longops
order by start_time desc
)
where rownum <=1;
Example 2:
select
round(sofar/totalwork*100,2) percent_completed,
v$session_longops.*
from
v$session_longops
where
sofar <> totalwork
order by
target, sid;
Example 3:
Select 'long', to_char (l.sid), to_char (l.serial#), to_char(l.sofar), to_char(l.totalwork), to_char(l.start_time, 'DD-Mon-YYYY HH24:MI:SS' ),
to_char ( l.last_update_time , 'DD-Mon-YYYY HH24:MI:SS'), to_char(l.time_remaining), to_char(l.elapsed_seconds),
l.opname,l.target,l.target_desc,l.message,s.username,s.osuser,s.lockwait from v$session_longops l, v$session s
where l.sid = s.sid and l.serial# = s.serial#;
Select 'long', to_char (l.sid), to_char (l.serial#), to_char(l.sofar), to_char(l.totalwork), to_char(l.start_time, 'DD-Mon-YYYY HH24:MI:SS' ),
to_char ( l.last_update_time , 'DD-Mon-YYYY HH24:MI:SS'), s.username,s.osuser,s.lockwait from v$session_longops l, v$session s
where l.sid = s.sid and l.serial# = s.serial#;
14. CREATE A DATABASE USER:
-- EXAMPLE STANDARD DATABASE USER:
CREATE USER albert identified by albert
DEFAULT TABLESPACE SALESDATA -- salesdata is a tablespace
TEMPORARY TABLESPACE TEMP
QUOTA 100M ON SALESDATA
QUOTA 20M ON USERS
;
-- GRANT standard roles:
GRANT connect TO albert;
GRANT resource TO albert;
-- GRANT specific privileges:
GRANT create trigger TO albert;
GRANT create sequence TO albert;
GRANT create procedure TO albert;
-- DROP the user:
DROP USER albert cascade;
-- EXAMPLE (external) USER:
CREATE USER global_user
IDENTIFIED GLOBALLY AS 'CN=jjones, OU=sales, O=antapex, C=NL'
DEFAULT TABLESPACE users
QUOTA 500M ON users;
-- EXAMPLE (Windows AD authenticed user) USER:
Suppose we have the account Harry01 from the XYZ domain. For access to Oracle, we can create
the following registration, which does not need to logon to Oracle.
CREATE USER "OPS$XYZ\Harry01"
IDENTIFIED EXTERNALLY
DEFAULT TABLESPACE SALES_DATA
TEMPORARY TABLESPACE TEMP
PROFILE DEFAULT
ACCOUNT UNLOCK
QUOTA 100M ON SALES_DATA
GRANT CONNECT TO "OPS$XYZ\Harry01";
GRANT READ_SALES TO "OPS$XYZ\Harry01";
GRANT RESOURCE TO "OPS$XYZ\Harry01";
GRANT SELECT_CATALOG_ROLE TO "OPS$XYZ\Harry01";
GRANT ADMINISTER DATABASE TRIGGER TO "OPS$XYZ\Harry01";
GRANT ALTER USER TO "OPS$XYZ\Harry01";
GRANT CREATE INDEXTYPE TO "OPS$XYZ\Harry01";
GRANT CREATE LIBRARY TO "OPS$XYZ\Harry01";
GRANT CREATE OPERATOR TO "OPS$XYZ\Harry01";
GRANT CREATE PROCEDURE TO "OPS$XYZ\Harry01";
GRANT CREATE PUBLIC SYNONYM TO "OPS$XYZ\Harry01";
GRANT CREATE SEQUENCE TO "OPS$XYZ\Harry01";
GRANT CREATE SESSION TO "OPS$XYZ\Harry01";
GRANT CREATE TABLE TO "OPS$XYZ\Harry01";
GRANT CREATE TRIGGER TO "OPS$XYZ\Harry01";
GRANT CREATE TYPE TO "OPS$XYZ\Harry01";
GRANT CREATE VIEW TO "OPS$XYZ\Harry01";
GRANT DROP PUBLIC SYNONYM TO "OPS$XYZ\Harry01";
GRANT UNLIMITED TABLESPACE TO "OPS$XYZ\Harry01";
15. FINDING INVALID OBJECTS AND REPAIR:
-- Finding invalid objects:
SELECT owner, substr(object_name, 1, 30), object_type, created,
last_ddl_time, status
FROM dba_objects
WHERE status='INVALID';
-- Recompile packages:
SELECT 'ALTER '||decode( object_type,
'PACKAGE SPECIFICATION'
,'PACKAGE'
,'PACKAGE BODY'
,'PACKAGE'
,object_type)
||' '||owner
||'.'|| object_name ||' COMPILE '
||decode( object_type,
'PACKAGE SPECIFICATION'
,'SPECIFACTION'
,'PACKAGE BODY'
,'BODY'
, NULL) ||';'
FROM dba_objects WHERE status = 'INVALID';
-- Using DBMS_UTILITY.compile_schema to compile all objects in a schema:
Example:
exec DBMS_UTILITY.compile_schema('HARRY');
-- Manually recompile objects like views, triggers etc..:
ALTER PACKAGE my_package COMPILE;
ALTER PACKAGE my_package COMPILE BODY;
ALTER PROCEDURE my_procedure COMPILE;
ALTER FUNCTION my_function COMPILE;
ALTER TRIGGER my_trigger COMPILE;
ALTER VIEW my_view COMPILE;
16. CREATING AND REBUILDING INDEXES:
16.1 EXAMPLES ON HOW TO CREATE INDEXES:
-- Examples of ordinary index:
CREATE INDEX indx_cust_id ON CUSTOMERS(cust_id);
CREATE INDEX indx_cust_id ON CUSTOMERS(cust_id) nologging;
CREATE INDEX indx_cust_id ON CUSTOMERS(cust_id) TABLESPACE SALES_INDEX01;
CREATE INDEX index_employees ON EMPLOYEES(last_name, job_id, salary); -- multiple columns
-- Some special types of indexes:
-- reverse key:
CREATE INDEX indx_r_name ON RESTAURANTS(r_name) REVERSE;
-- bitmap index:
CREATE BITMAP INDEX indx_gender ON EMPLOYEE (gender) TABLESPACE EMPDATA;
-- function based index:
CREATE INDEX emp_total_sal_idx ON employees (12 * salary * commission_pct, salary, commission_pct);
16.2 EXAMPLES ON HOW TO REBUILD INDEXES:
-- Note that rebuilding large, or many, indexes, will generate, or add, to redo logging as well.
-- Therefore, in some cases the NOLOGGING keyword maybe of help.
-- Also, in case of very large, or a very large number of big indexes, rebuilding will be a major task.
-- This note is not about the best practises on when to rebuild indexes.
Examples:
alter index HARRY.EMPNO_INDEX rebuild;
alter index HARRY.EMPNO_INDEX rebuild nologging;
alter index HARRY.EMPNO_INDEX rebuild tablespace SALES_INDEX_02; -- rebuild to another tablespace
-- Create a list of rebuild index statements:
SELECT 'ALTER INDEX HARRY.'||index_name||' REBUILD;' from dba_indexes
where owner='HARRY';
17. GETTING PRODUCT/PARAMETER INFORMATION:
17.1 OPTIONS, VERSION, FEATURES:
SELECT * FROM V$VERSION;
SELECT * FROM V$OPTION;
SELECT * FROM V$LICENSE;
SELECT * FROM PRODUCT_COMPONENT_VERSION;
17.2 COLLATION:
SELECT * FROM NLS_DATABASE_PARAMETERS;
SELECT * FROM NLS_SESSION_PARAMETERS;
SELECT * FROM NLS_INSTANCE_PARAMETERS;
17.3 PARAMETERS/OPTIONS:
SELECT * FROM DBA_REGISTRY;
SELECT * FROM v$parameter;
18. KILLING AN ORACLE SESSION:
18.1 Single instance:
From v$session, you can obtain the Oracle Session ID (sid) and serial#.
If a Oracle session must be "killed", you can use the following ALTER SYSTEM command:
ALTER SYSTEM KILL SESSION 'sid, serial#';
Example:
ALTER SYSTEM KILL SESSION '77,285';
The above statement does not use brutal force to end the session, if currectly transactions are
associated with that session. So, it might show up as having a status of "marked for kill".
18.2 Cluster:
In a RAC cluster environment, a third parameter parameter should be added, which is the instance ID:
ALTER SYSTEM KILL SESSION 'sid, serial#,@inst_id';
18.3 Additional clauses:
A few additional clauses can be used with the ALTER SYSTEM KILL SESSION statement, like for example:
ALTER SYSTEM KILL SESSION 'sid, serial#' IMMEDIATE;
The above command, will terminate the session and possible ongoing transactions will roll back.
18.4 Killing OS processes:
If you have identified the "process id" of the OS process which is associated to the Oracle session,
you might consider "killing" the process from the OS prompt.
Example on Windows:
C:\> orakill SALES 22389
Example on Unix/Linux:
% kill -9 55827
19. 9i,10g,11g INIT.ORA/SPFILE.ORA parameters:
19.1 ABOUT THE SPFILE/INIT.ORA FILES:
The "spfile.ora" (or "init.ora") instance startup configuration file, determines in a large way,
how the instance will be configured. Think of the size of SGA memory, how many processes are allowed,
location of controlfiles, location of archived redologs etc.. etc..
As of 9i, a (binary) spfile.ora is used. However, it's still possible to start a 9i/10g/11g instance
using a tradional (ascii) init.ora file.
If at a closed instance, you would do this:
SQL> connect / as sysdba
SQL> startup
Then the default spfile.ora would be used.
But, at a closed instance, if you would do this:
SQL> connect / as sysdba
SQL> startup mount pfile=/apps/oracle/product/10.2/admin/test10g/pfile/init.ora
SQL> alter database open;
Then that specific init.ora would be used to start and configure the instance.
Since the spfile.ora is not ascii, it's not easy to view the file directly
.
In section 10, we showed how to create an ascii init.ora file from an spfile.
One small advantage from an init.ora, is that it is easy to view it with any editor, or just with shell commands.
Here are a few examples again:
CREATE SPFILE='/opt/oracle/product/10.2/dbs/spfileSALES.ora'
FROM PFILE='/opt/oracle/product/10.2/admin/scripts/init.ora';
CREATE SPFILE='/opt/app/oracle/product/9.2/dbs/spfilePEGACC.ora'
FROM PFILE='/opt/app/oracle/admin/PEGACC/scripts/init.ora';
For viewing settings from the SQL> prompt, you can use the "show parameter" command, like so:
SQL> show parameter spfile
spfile string C:\ORACLE\PRODUCT\10.2\DB_1\DATABASE\SPFILETEST10G.ORA
So, that shows you the location of the spfile itself.
SQL> show parameter sga
NAME TYPE VALUE
lock_sga boolean FALSE
pre_page_sga boolean FALSE
sga_max_size big integer 280M
sga_target big integer 280M
So, the upper command shows you SGA (shared memory) related settings.
19.2 CLUSTER AND INSTANCE SPECIFIC PARAMETERS:
On a simple 10g test database, I created a init.ora file (see section 10), and a small partial section is shown below:
*.db_recovery_file_dest_size=2147483648
*.dispatchers='(PROTOCOL=TCP) (SERVICE=test10gXDB)'
*.job_queue_processes=10
*.open_cursors=300
*.pga_aggregate_target=96468992
*.processes=150
test10g.__db_cache_size=167772160
test10g.__java_pool_size=16777216
test10g.__large_pool_size=4194304
What's typical for 10g/11g, is that for the "*." settings, it means it's in effect for all instances in a cluster.
It;s there even if you just use a stand allone instance.
The records that are like "instance_name.setting", it means that it is in effect for that instance only.
So, If an initialization parameter applies to all instances, use *.parameter notation, otherwise
prefix the parameter with the name of the instance.
For example:
Assume that you start the instance "prod1" (in a cluster) with an SPFILE containing the following entries:
*.OPEN_CURSORS=500
prod1.OPEN_CURSORS=1000
Then OPEN_CURSORS=1000 is in effect only for the instance prod1.
19.3 EXAMPLE 10g/11g INIT.ORA, OR SPFILE.ORA:
-Example 1:
###########################################
# Cache and I/O
###########################################
db_block_size=8192
db_file_multiblock_read_count=16
###########################################
# Cursors and Library Cache
###########################################
open_cursors=300
###########################################
# Database Identification
###########################################
db_domain=antapex.org
db_name=test10g
###########################################
# Diagnostics and Statistics
###########################################
# Diagnostic locations (logfiles etc..) 10g parameters:
background_dump_dest=C:\oracle/admin/test10g/bdump
core_dump_dest=C:\oracle/admin/test10g/cdump
user_dump_dest=C:\oracle/admin/test10g/udump
# Diagnostic locations (logfiles etc..) 11g parameters:
DIAGNOSTIC_DEST=C:\oracle\
###########################################
# File Configuration
###########################################
control_files=("C:\oracle\oradata\test10g\control01.ctl", "C:\oracle\oradata\test10g\control02.ctl", "C:\oracle\oradata\test10g\control03.ctl")
db_recovery_file_dest=C:\oracle/flash_recovery_area
db_recovery_file_dest_size=2147483648
###########################################
# Job Queues
###########################################
job_queue_processes=10
###########################################
# Miscellaneous
###########################################
# 10g example:
# compatible=10.2.0.1.0
# 11g example:
compatible=11.1.0.0.0
###########################################
# Processes and Sessions
###########################################
processes=350
###########################################
# Memory
###########################################
# Example 10g setting:
sga_target=287309824
# Example 11g setting:
memory_target=287309824
###########################################
# Security and Auditing
###########################################
audit_file_dest=C:\oracle/admin/test10g/adump
remote_login_passwordfile=EXCLUSIVE
###########################################
# Shared Server
###########################################
dispatchers="(PROTOCOL=TCP) (SERVICE=test10gXDB)"
###########################################
# Sort, Hash Joins, Bitmap Indexes
###########################################
pga_aggregate_target=95420416
###########################################
# System Managed Undo and Rollback Segments
###########################################
undo_management=AUTO
undo_tablespace=UNDOTBS1
###########################################
# Archive Mode:
###########################################
LOG_ARCHIVE_DEST_1=c:\oracle\oradata\archlog
LOG_ARCHIVE_FORMAT='arch_%t_%s_%r.dbf'
- Example 2: Exported 11g spfile to an ascii init file
test11g.__db_cache_size=281018368
test11g.__java_pool_size=12582912
test11g.__large_pool_size=4194304
test11g.__oracle_base='c:\oracle' #ORACLE_BASE set from environment
test11g.__pga_aggregate_target=322961408
test11g.__sga_target=536870912
test11g.__shared_io_pool_size=0
test11g.__shared_pool_size=230686720
test11g.__streams_pool_size=0
*.audit_file_dest='c:\oracle\admin\test11g\adump'
*.audit_trail='db'
*.compatible='11.1.0.0.0'
*.control_files='c:\oradata\test11g\control01.ctl','c:\oradata\test11g\control02.ctl','c:\oradata\test11g\control03.ctl'
*.db_block_size=8192
*.db_domain='antapex.nl'
*.db_name='test11g'
*.db_recovery_file_dest='c:\oracle\flash_recovery_area'
*.db_recovery_file_dest_size=2147483648
*.diagnostic_dest='c:\oracle'
*.dispatchers='(PROTOCOL=TCP) (SERVICE=test11gXDB)'
*.memory_target=857735168
*.open_cursors=300
*.processes=350
*.remote_login_passwordfile='EXCLUSIVE'
*.undo_tablespace='UNDOTBS1'
19.4 IMPORTANT SPFILE/INIT PARAMETERS:
Let's review some of the most important init.ora parameters.
19.4.1. Parameters related to Oracle Managed Files OMF:
DB_CREATE_FILE_DEST = directory | ASM disk group
DB_CREATE_ONLINE_LOG_DEST_n = directory | ASM disk group
DB_CREATE_FILE_DEST specifies the default location for Oracle-managed datafiles.
This location is also used as the default location for Oracle-managed control files
and online redo logs if none of the DB_CREATE_ONLINE_LOG_DEST_n initialization parameters are specified.
DB_CREATE_ONLINE_LOG_DEST_n (where n = 1, 2, 3, ... 5) specifies the default location
for Oracle-managed control files and online redo logs.
If more than one DB_CREATE_ONLINE_LOG_DEST_n parameter is specified, then the control file and
online redo log is multiplexed across the locations of the other DB_CREATE_ONLINE_LOG_DEST_n parameters.
One member of each online redo log is created in each location, and one control file is created in each location.
Example:
DB_CREATE_FILE_DEST = '/u01/oracle/test10g'
DB_CREATE_ONLINE_LOG_DEST_1= '/u02/oracle/test10g'
DB_CREATE_ONLINE_LOG_DEST_2= '/u03/oracle/test10g'
19.4.2. Parameters related to the FLASH RECOVERY AREA (10g / 11gR1) or FAST RECOVERY AREA (11gR2)
In 11gR2, the "FLASH RECOVERY AREA" is renamed to "FAST RECOVERY AREA".
A flash recovery area is a location in which Oracle Database can store and manage files
related to backup and recovery. It is distinct from the database area.
Two parameters define the "FLASH RECOVERY AREA" or "FAST RECOVERY AREA":
You specify a flash recovery area with the following initialization parameters:
DB_RECOVERY_FILE_DEST (= location on filesystem or ASM)
DB_RECOVERY_FILE_DEST_SIZE (size reserved for DB_RECOVERY_FILE_DEST)
DB_RECOVERY_FILE_DEST specifies the default location for the flash recovery area. The flash recovery area contains
archived redo logs, flashback logs, and RMAN backups.
The DB_RECOVERY_FILE_DEST parameter makes sure that all flashback logs, RMAN backups, archived logs,
are under the control of the Instance.
Specifying this parameter without also specifying the DB_RECOVERY_FILE_DEST_SIZE initialization parameter is not allowed.
DB_RECOVERY_FILE_DEST_SIZE specifies (in bytes) the hard limit on the total space to be used
by target database recovery files created in the flash recovery area.
You cannot enable these parameters if you have set values for the LOG_ARCHIVE_DEST and
LOG_ARCHIVE_DUPLEX_DEST parameters. You must disable those parameters before setting up
the flash recovery area. You can instead set values for the
LOG_ARCHIVE_DEST_n parameters. If you do not set values for local LOG_ARCHIVE_DEST_n,
then setting up the flash recovery area will implicitly set LOG_ARCHIVE_DEST_10 to the flash recovery area.
Oracle recommends using a flash recovery area, because it can simplify backup and recovery operations for your database.
You may also set the DB_FLASHBACK_RETENTION_TARGET parameter.
This specifies in minutes how far back you can "flashback" the database, using the socalled "Flashback" framework.
How far back one can actually "flashback" the database, depends on how much flashback data
Oracle has kept in the recovery area.
Example:
db_recovery_file_dest='c:\oracle\flash_recovery_area'
db_recovery_file_dest_size=2147483648
19.4.3. Parameters related to Automatic Diagnostic Repository ADR:
This is for 11g only.
Oracle 9i and 10g uses the well known locations for the alert.log and trace files, which are specified by:
BACKGROUND_DUMP_DESTINATION, USER_DUMP_DESTINATION and CORE_DUMP_DESTINATION.
ADR is defined by the DIAGNOSTIC_DEST parameter, which specifies a location on the filesystem.
ADR is new in 11g, and is partly XML based. The logging (alert.log) and traces are part of ADR.
DIAGNOSTIC_DEST = { pathname | directory }
As of Oracle 11g Release 1, the diagnostics for each database instance are located in a dedicated directory,
which can be specified through the DIAGNOSTIC_DEST initialization parameter.
This location is known as the Automatic Diagnostic Repository (ADR) Home. For example, if the database name is proddb
and the instance name is proddb1, the ADR home directory would be "$DIAGNOSTIC_DEST/diag/rdbms/proddb/proddb1".
So, if the DIAGNOSTIC_DEST was placed to "C:\ORACLE", you would find the new style XML alert.log "log.xml" in, for example,
"C:\oracle\diag\rdbms\test11g\test11g\alert\log.xml" for the test11g instance.
The old plain text alert.log is still available in:
"C:\oracle\diag\rdbms\test11g\test11g\trace\alert_test11g.log"
19.4.4. Parameters related to DATABASE NAME AND DOMAIN:
The databasename, and the domain where it "resides", are defined by the parameters:
DB_NAME
DB_DOMAIN
The DB_NAME initialization parameter determines the local name component of the database name,
the DB_DOMAIN parameter, which is optional, indicates the domain (logical location) within a
network structure. The combination of the settings for these two parameters must
form a database name that is unique within a network.
For example, a database with a global database name of "test10g.antapex.org",
you would have the parameters like so:
DB_NAME = test10g
DB_DOMAIN = antapex.org
19.4.5. Parameters related to PROCESSES AND SESSIONS:
PROCESSES=max number of concurrent OS processes which can connect to the database.
SESSIONS=specifies the maximum number of sessions that can be created in the database.
Example:
PROCESSES=500
The PROCESSES initialization parameter determines the maximum number of
operating system processes that can be connected to Oracle Database concurrently.
The value of this parameter must be a minimum of one for each background process plus
one for each user process. The number of background processes will vary according
the database features that you are using. For example, if you are using Advanced
Queuing or the file mapping feature, you will have additional background processes.
If you are using Automatic Storage Management, then add three additional processes
for the database instance.
SESSIONS specifies the maximum number of sessions that can be created in the system.
Because every login requires a session, this parameter effectively determines the maximum number of
concurrent users in the system. You should always set this parameter explicitly to a value equivalent
to your estimate of the maximum number of concurrent users, plus the number of background processes,
plus approximately 10% for recursive sessions.
Note: it would not be a very good idea to specify the SESSION= parameter
which is lower than the PROCESSES parameter.
The default no of sessions: (1.1 * PROCESSES) + 5
19.4.6. Parameters related to MEMORY and SGA:
Memory = SGA memory (like buffer cache + all pools) + All server processes and background processes PGA's
- 11g: (Full) Automatic Memory Management = AMM -> by using parameter "MEMORY_TARGET="
- 10g/11g: Automatic Shared Memory Management = ASMM -> by using parameter"SGA_TARGET="
or
- 11g/10g/9i: Manual Memory Management, where you can specify all the individual buffers and poolsizes + pga's.
So, 11g AMM (is Total memory management) "is more" automatic than 11g/10g ASMM (auto SGA management) which is more automatic
than manual configuration of 11g/10g/9i cache, pools and pga's.
=> For 11g and 10g, it is possible to use the SGA_TARGET parameter.
"SGA_TARGET=amount_of_memory" is actually a single parameter for the total SGA size under Oracle control, where
automatically all SGA components (buffer cache and all pools) are sized as needed
.
When using SGA_TARGET=, then you do not need to specify all individual area's like:
DB_CACHE_SIZE (DEFAULT buffer pool)
SHARED_POOL_SIZE (Shared Pool)
LARGE_POOL_SIZE (Large Pool)
JAVA_POOL_SIZE (Java Pool)
=> For 11g, it goes a step further, and it is possible to use the MEMORY_TARGET parameter.
"MEMORY_TARGET=amount_of_memory" controls all memory automatically (SGA with all pools and buffers, and all pga's).
While it is better to use MEMORY_TARGET in 11g, you can still use the SGA_TARGET parameter to control the SGA only.
Also, it's still possible to manually configure all memory as you see fit, by using all individual parameters
like "SHARED_POOL_SIZE=", "DB_CACHE_SIZE=" etc..
MEMORY_TARGET and SGA_TARGET will perform automatic memory management (memory_target for all memory, sga_target for the SGA)
Both parameters can be used in conjunction with a hard upper limit for the total memory that can be used.
These are: memory_max_target and sga_max_size.
So, the following parameters might be seen as being set in an spfile.ora/init.ora:
11g:
MEMORY_TARGET=
MEMORY_MAX_TARGET=
10g and 11g:
SGA_TARGET=
SGA_MAX_SIZE=
Prior to Oracle 11g, you could set the sga_target and sga_max_size parameters, allowing Oracle to allocate
and re-allocate RAM within the SGA. The PGA was independent from this, and was set by the pga_aggregate_target parameter.
In Oracle 11g you may use the memory_max_target parameter which determines the total maximum RAM for both the PGA and SGA area's
The new MEMORY-TARGET parameter, "targets" for the set size, and even allows RAM to be "stealed" from the SGA
and transferred to the PGA, or the other way around.
19.4.7. Parameters related to ADDM and AWR:
Oracle Diagnostics Pack 11g and 10g includes a self-diagnostic engine built right into the
Oracle Database 11g kernel, called the "Automatic Database Diagnostic Monitor", or ADDM.
To enable ADDM to accurately diagnose performance problems, it is important that
it has detailed knowledge of database activities and the workload the database is
supporting. Oracle Diagnostics Pack 11g (and 10g), therefore, includes a built in repository
within every Oracle 11g (and 10g) Database, called "Automatic Workload Repository (AWR)",
which contains operational statistics about that particular database and other relevant
information. At regular intervals (once an hour by default), the Database takes a
snapshot of all its vital statistics and workload information and stores them in AWR,
and retains the statistics in the workload repository for 8 days.
Also, by default, ADDM runs every hour to analyze snapshots taken by AWR during that period.
Note: for people familiar with older Oracle versions: ADDM and AWR resembles an strongly enhanced
and automatically implemented "STATSPACK".
So, ADDM examines and analyzes data captured in the Automatic Workload Repository (AWR) to determine
possible performance problems in Oracle Database. ADDM then locates the root causes of the performance problems,
provides recommendations for correcting them, and quantifies the expected benefits.
A key component of AWR, is "Active Session History (ASH)". ASH samples the
current state of all active sessions periodically and stores it in memory. The data
collected in memory can be accessed by system views. This sampled data is also
pushed into AWR every hour for the purposes of performance diagnostics.
For 11g, ADDM and AWR/ASH are part of the "Server Manageability Packs". In fact, the components are the following:
- The DIAGNOSTIC pack includes AWR and ADDM.
- The TUNING pack includes SQL Tuning Advisor, SQLAccess Advisor, and so on.
CONTROL_MANAGEMENT_PACK_ACCESS parameter:
The "CONTROL_MANAGEMENT_PACK_ACCESS" parameter determines which of the above components are "switched on".
CONTROL_MANAGEMENT_PACK_ACCESS = { NONE | DIAGNOSTIC | DIAGNOSTIC+TUNING }
Default: DIAGNOSTIC+TUNING
If set to NONE, the ADDM & AWR and TUNING pack, are switched off.
STATISTICS_LEVEL parameter:
STATISTICS_LEVEL specifies the level of collection for database and operating system statistics.
STATISTICS_LEVEL = { ALL | TYPICAL | BASIC }
Default: TYPICAL
Gathering database statistics using AWR is enabled by default and is controlled by the STATISTICS_LEVEL
initialization parameter.
The STATISTICS_LEVEL parameter should be set to TYPICAL or ALL to enable statistics gathering by AWR.
The default setting is TYPICAL.
Setting the STATISTICS_LEVEL parameter to BASIC disables many Oracle Database gathering statistics,
including AWR/ASH, and is not recommended unless you want to reserve as much as possible performance for
the applicative database processes.
20. DIAGNOSTIC/PERFORMANCE TOOLS IN 9i: A FEW WORDS ON STATSPACK:
For the 10g/11g ADDM and AWR implementation, or the successor for STATSPACK, please see section 29.
Although statspack is a typical 8i/9i Diagnostic tool, I still like to spend a few words on it.
For 10g and later, you are recommended to use the newer frameworks.
STATSPACK is a performance diagnostic tool, which is available since Oracle8i.
It's widely used in Oracle 8i and 9i environments. But, from 10g onwards, a renewed framework
was introduced (like for example ADDM). So, in 10g and 11g, ofcourse the newer Diagnostic tools are recommended.
Still, it's usefull to spend a few words on statspack, since it's so incredably easy to use.
And who knows.. maybe you want to use it on 10g as well.
However, correctly interpreting the reports, still requires a reasonable system and Oracle knowledge.
.
20.1 INSTALLING:
It's recommended to create a tablespace "PERFSTAT" first. Since the schema (owner) of the new
diagnostic tables, is the new user "perfstat", it's nice to keep all objects together in a easy
to indentify tablespace.
Next, from sqlplus, run the create script
"$ORACLE_HOME/rdbms/admin/statscre.sql" (Unix) or "%ORACLE_HOME%\rdbms\admin\statscre.sql" (Windows).
This script will ask a few simple questions like who should be the owner (the suggested owner is "perfstat")
and which tablespace you want to use to store perfstat's tables.
Although some additional configuration (after installation) can be done,like altering the "Collection Level",
you are now "basically" setup to create "snapshots" and create "reports".
20.2 A FEW WORDS ON HOW IT WORKS:
You know that there are quite a few dynamic system "views" (v$), which collect database wide statistics,
many of which are related to performance and wait events
Statspack will use a number of true permanent tables which has a one to one correspondence to that
set of v$ views (for example v$sysstat will have a corresponding stats$sysstat table)
Well it's almost one to one, because the statspack table will have some additional columns
of which (in this note) the "snap_id" column is the most interresting one.
When you "activate" statspack, you will create a "snapshot" of the database, meaning
that the set of v$ views are queried, and the results are stored in the "stats$" tables, where these
specific results are identified by a specific "SNAP_ID".
The next time you run statspack, a new SNAP_ID will identify these new measurements.
And so on.. and so on.
It is quite critical to your understanding of the STATSPACK utility that you realize that the information
captured by a STATSPACK snapshot are accumulated values, since most of the v$ views contain accumulated values.
This automatically means, that you only can compare two snapshots, to get meaningfull results.
Examples:
- You could create a snapshot early in the morning, and one late in the afternoon, and then analyze the results
to see how the database has performed this day.
- You could create a snapshot before a certain batch (or other program) runs, and then one when that batch has finished.
Note:
Since the v$ views are cumulative, the stats$ are thus too. But an instance shutdown will "clear" many v$ views,
thus creating a report using snapshots before and after a shutdown, will not generate valid results.
20.3 A FEW WORDS ON USING STATSPACK:
- Creating a snapshot:
Logon (using sqlplus) as perfstat and execute the 'statspack.snap' package.
SQL> execute statspack.snap;
- Creating a report:
The report will just be an ascii file, so it's easy to view the contents.
Log on as perfstat using sqlplus:
% sqlplus perfstat/perfstat
Then run the 'spreport.sql' script that lives in the "ORACLE_HOME/rdbms/admin" directory.
SQL> @?/rdbms/admin/spreport.sql
This script essentially asks three important questions:
- The begin SNAP_ID
- The end SNAP_ID
- And where you want to store the report with what name.
A short while later, you can study that report. The report will show you much information like
general database statistics, top consuming SQL statements, %cpu and duration per SQL etc..
20.4 OTHER NOTES:
- Since "execute statspack.snap" will create a snapshot, it's easy to schedule it from an OS scheduler.
But don't schedule it like "every ten minutes". That will not add any value. Once an hour, or a longer interval,
is recommended.
Also, if you need to analyze batches, it's more sane to schedule it before and after those batch(es).
- If you need to view the snap_id's and at which time they have run, use a query like:
select name,snap_id,to_char(snap_time,'DD.MM.YYYY:HH24:MI:SS')
"Date/Time" from stats$snapshot,v$database;
That information can be used to select the correct start snap_id and end snap_id for your report.
21. USING A CURSOR IN PL/SQL LOOPS:
We are going to illustrate the use of a "cursor" in PLSQL loops.
PLSQL has more "ways" to create loops, like for example using "FOR.." or "WHILE.." loops
But this section wants to give a few examples using a cursor.
In many occasions, you might view a cursor as a virtual table, because you often "declare" the cursor
as being a resultset from a query on one or more tables.
Assuming you work on a testsystem, let's create a testuser first, who will perform
a couple of examples.
CREATE USER albert identified by albert
DEFAULT TABLESPACE USERS
TEMPORARY TABLESPACE TEMP
;
GRANT connect TO albert;
GRANT resource TO albert;
GRANT DBA TO albert;
EXAMPLE 1:
Let's use a cursor to output the contents of a table to your screen.
- Lets connect as albert:
SQL> connect albert/albert
- Now albert will create a simple table:
CREATE TABLE EMPLOYEE
(
EMP_ID NUMBER,
EMP_NAME VARCHAR2(20),
SALARY NUMBER(7,2)
);
- Albert now performs a few inserts:
INSERT INTO EMPLOYEE VALUES (1,'Harry',2000);
INSERT INTO EMPLOYEE VALUES (2,'John',3150);
INSERT INTO EMPLOYEE VALUES (3,'Mary',4000);
INSERT INTO EMPLOYEE VALUES (4,'Arnold',2900);
commit;
- Now we want to output the contents of the table (ofcourse it's easier using a select statement, but we want
to demonstrate the use of a cursor).
Let's try the following code:
SQL> set serveroutput on; -- in order to make sure sqlplus shows output.
-- here is the code:
DECLARE cursor CURTEST IS
SELECT emp_id, emp_name FROM EMPLOYEE;
cur_rec curtest%rowtype;
begin
for cur_rec IN CURTEST loop
dbms_output.put_line(TO_CHAR(cur_rec.emp_id)||' '||cur_rec.emp_name);
end loop;
end;
/
The first block is the cursor declaration. You notice that "CURTEST" is declared as being the
resultset of a query?
Here we also declare the variable "cur_rec", which (when assigned values) contains a whole "row"
from the cursor. You see? This is a very easy way to assign a whole row to variable in one time!
The second block is the "body" of the code. Here we open (implicitly) the cursor "CURTEST", and define a loop
where "cur_rec" in each cycle of the loop, attains the values from the next row in "CURTEST".
What we then actually do in such a cycle in the loop, is just output two values in "cur_rec" to your screen
using the standard Oracle procedure "dbms_output.put_line()".
Did you notice that we did not explicitly "open" and later (after the loop is done), "close" the cursor?
In the "for var in cursor_name loop .. end loop" structure, the open and close of the cursor is
implicitly done.
EXAMPLE 2:
This time, we use a cursor to update a certain table, with new values and certain values from a second table.
First, albert creates the EMPBONUS table, like so:
CREATE TABLE EMPBONUS
(
EMP_ID NUMBER,
EMP_BONUS NUMBER(7,2)
);
What we want to do now, is fill the EMPBONUS table with emp_id's from EMPLOYEE,
and a calculated bonus amount which is 10% of the employee's salary.
Again, using a simple query, works much faster, but again we want to demonstrate the use of a cursor.
Let's try the following code:
SQL> set serveroutput on; -- in order to make sure sqlplus shows output.
-- here is the code:
DECLARE cursor CURTEST IS
SELECT * FROM EMPLOYEE;
cur_rec curtest%rowtype;
begin
for cur_rec IN CURTEST loop
INSERT INTO EMPBONUS
VALUES
(cur_rec.emp_id,0.1*cur_rec.salary);
commit;
end loop;
end;
/
Let's see what's in the EMPBONUS table
SQL> select * from EMPBONUS;
EMP_ID EMP_BONUS
1 200
2 315
3 400
4 290
So, it worked !
MORE ON USING CURSORS:
There are two types of cursors with respect on how the cursor is opened and closed
and whether you need to explicitly FETCH the next row from the cursor.
- The "CURSOR FOR LOOP.." structure, which we already have seen above. This one does not use FETCH
in order to fetch the next row from the cursor. This is implicitly done in the "for..loop".
Also, here you do not need to open and close the cursor.
- The "OPEN cursor, FETCH next, CLOSE cursor" structure.
The first type is really easy to use. The second type gives you a little more control in your code.
The following "cursor attributes" can be used (among others):
%notfound : did we just have fetched the last row in the cursor?
%rowcount : how many rows are already processed or done?
%isopen : is the cursor still open?
As an example of the second type, let's take a look at the next example.
We are going to use a more extended EMPLOYEE table in this example. So we could either add a column, or
just drop and re-create the new EMPLOYEE table again. Let's do the latter.
SQL> connect albert/albert
DROP TABLE EMPLOYEE;
CREATE TABLE EMPLOYEE
(
EMP_ID NUMBER,
EMP_NAME VARCHAR2(20),
SALARY NUMBER(7,2),
JOB VARCHAR2(20)
);
- Albert now performs a few inserts:
INSERT INTO EMPLOYEE VALUES (1,'Harry',2000,'CLERK');
INSERT INTO EMPLOYEE VALUES (2,'John',3150,'DIRECTOR');
INSERT INTO EMPLOYEE VALUES (3,'Mary',4000,'SCIENTIST');
INSERT INTO EMPLOYEE VALUES (4,'Arnold',2900,'CLERK');
commit;
Now, we want to produce a script that will update the SALARY column of the EMPLOYEE table,
with a percentage that depends on the JOB of the employee, that is, a "CLERCK" gets another
salary update than a "DIRECTOR".
-- Here is the code. Also note it uses a type 2 cursor.
DECLARE cursor CUR_EMP IS
SELECT * FROM employee;
emp_rec CUR_EMP%rowtype;
begin
open CUR_EMP;
loop
fetch CUR_EMP into emp_rec;
exit when CUR_EMP%notfound;
if emp_rec.job='CLERK' then emp_rec.salary:=emp_rec.salary*1.2;
elsif emp_rec.job='SCIENTIST' then emp_rec.salary:=emp_rec.salary*1.5;
elsif emp_rec.job='DIRECTOR' then emp_rec.salary:=emp_rec.salary*1.7;
end if;
update EMPLOYEE set salary=emp_rec.salary
WHERE emp_id=emp_rec.emp_id;
end loop;
commit;
close cur_emp;
end;
/
Notes:
If you want to use loops in your scripts, you might also take a look at section 22.
Here we will show some examples of the regular "FOR.." and "WHILE.." loops, which in many cases
are much easier to use.
But I just wanted to touch the subject of an explicit cursor in this document.
Also, if you must process very large tables, then a cursor may not be the most effective way to do that.
22. EXECUTING SCRIPTS FROM THE "SQL>" PROMPT:
If you are at the "SQL>" prompt, you may wonder how to execute your blocks of code, or your scripts.
There are several ways to do that.
- If you have created a procedure, function, or package:
We have not done that yet in this document. In section 26 we are going to illustrate that.
- If you have "just" a block of code (like we have seen in section 21):
A: If you have that code created in your favourite editor, then just copy it, and paste it at
the "SQL>" prompt. This really works.
B: Suppose you have created the block of code using your favourite editor. Suppose you have saved it to a file.
Then you can run it from the "SQL>" prompt using the syntax:
SQL> @path_to_the_file/file_name
Note the use of the "@" symbol here.
Example:
Suppose in "C:\test" I have the file "update_customer.sql". If I want to run it from the "SQL>" prompt,
I can use this statement:
SQL> @c:\test\update_customer.sql
If I already 'was' in the c:\test directory, I can simply use "SQL> @update_customer.sql" because the prompt
tools will per default look in the current directory for the file.
EXECUTING SCRIPTS FROM THE OS PROMPT:
In this section, we might as well give an example of how to run an Oracle sqlplus script
from the operating system prompt, or from a cron job.
Create a shell script like for example:
sqlplus /nolog << EOF
connect / as sysdba
# YOUR STATEMENTS...
exit
EOF
$ORACLE_HOME/bin/sqlplus -s "/ as sysdba" < $tmp_file 2>1
set heading off feedback off
whenever sqlerror exit
select 'DB_NAME=' || name from v\$database;
.. # possible other stuff
exit
EOF
23. USING CONTROLS, AND "FOR.." AND "WHILE.." LOOPS IN PL/SQL:
Here we will present a few representative examples of "looping" structures in PL/SQL.
23.1 USING THE "WHILE..LOOP" STRUCTURE:
Example:
I presume you are working on a testsystem, so let's work as user albert again (see section 21).
let's logon as albert and create the EMPLOYEE table:
CREATE TABLE EMPLOYEE --If that table already exists, use "drop table employee;"
(
EMP_ID NUMBER(6) NOT NULL,
EMP_NAME VARCHAR2(20) NOT NULL,
SALARY NUMBER(7,2)
);
Suppose albert wants to insert 9999 dummy records into that table, he might use the following script.
Ofcourse, it's a silly example, but it nicely demonstrates the use of a "while [condition is true] loop" construct.
declare
i number := 1;
begin
while i<10000 loop
insert into EMPLOYEE
values (i,'harry',2500);
i := i + 1;
end loop;
commit;
end;
/
The first piece of code is a "variable declaration". We want to use the number "i" in our code, that starts out with
the value "1", and increases during each cycle of the loop, until it gets to the value of "10000".
Then the loop exits because the condition "while i<10000" is no longer true.
Here is another example using "WHILE [condition is true] LOOP"
Example:
declare -- again we start with a variable declaration
x number:=5;
begin -- here the "body" starts:
while x>0 loop
dbms_output.put_line('I did this '||TO_CHAR(x)||' times.');
x:=x-1;
end loop;
end;
/
23.2 USING THE "FOR..LOOP" STRUCTURE:
You typically use the "while" loop if you have an expression that evaluates to "true" for a certain time. As long as the loop cycles,
each time the expression is evaluated again and again to see if it's true or false. If it's false, then the loop exits.
You can clearly see that in the examples above, like in "while x>0" (here the "exprsession is x>0).
But you may not even know beforehand when the expression exactly evaluates to "true" or "false".
Suppose somewhere else in your code, you have a variable "v_proceed". Inside your while loop, there can be
all sorts of statements that may affect the value of "v_proceed". At a certain cycle, it may attain the value "false".
If you created your loop like this:
while v_proceed loop
do all sorts of statements.. also statements that alter the value of v_proceed
Then the loop exits when "v_proceed" is "false".
So, typically, you use "while" when a certain expression evaluates to "true" (or "false") and you know, or
dont know, when the expression evaluates to the inverse value.
Typically, using the "FOR.. LOOP", you already know beforehand the "range" for which the loop must run.
Here is a very simple example that demonstates the "FOR.. LOOP" structure:
set serveroutput on
declare
-- nothing to declare
begin
for x in 0..4 loop
dbms_output.put_line('I did this '||TO_CHAR(x)||' times.');
end loop;
end;
/
23.3 USING THE "LOOP.. END LOOP" STRUCTURE:
Maybe the following looping control is the "King of all Oracle loops". It's very simple to use.
It always has the following structure:
loop
statements (which must be repeated)
way to evaluate if the loop must exit or not
end loop;
So, you always start simply with "loop", and you end the code with "end loop".
But, as with all loops, you need to have a way that evaluates whether the loop must exit or not.
There are a few variants here, and the most used are:
loop
statements;
if condition then exit;
end loop;
and
loop
statements;
exit when condition;
end loop;
A few examples will make it clear.
Example 1:
declare
x number:=5;
begin
loop
dbms_output.put_line('I did this '||TO_CHAR(x)||' times.');
x:=x-1;
if x=0 then exit;
end if;
end loop;
end;
/
Example 2:
declare
x number:=5;
begin
loop
dbms_output.put_line('I did this '||TO_CHAR(x)||' times.');
x:=x-1;
exit when x=0; -- here we don't have the "if" test to evaluate if x=0
end loop;
end;
/
24. HOW TO PUT SQLPLUS OUTPUT IN A SHELL VARIABLE:
Suppose you want to place some sqlplus output into a shell variable.
Here, you should think of a normal sh or ksh shell variable of UNIX or Linux.
The following example shows a script that will do just that.
Ofcourse, the method works best if only one value is returned into that variable.
Example: a sh, ksh or bash script:
login='dbuser/password@DBNAME'
code=`sqlplus -s $login << EOF
SELECT name from PERSON where id=1; # suppose we have the table PERSON, and we only want the name of id=1
exit
EOF`
echo $code # now the variable code should contain that name
25. INSTANCE STARTUP OPTIONS:
The following is important if you just want to manually startup an Instance,
and optionally open the Database.
If an Instance is down, and the database closed, then the following startup options can be used.
Here, a SQLPLUS session is assumed and all environment variable (like ORACLE_SID) are set.
SQL> startup nomount
- The instance is started and the pfile/spfile is read. So all init parameters are known
to the instance, like for example SGA parameters.
- However, the controlfile is NOT read.
- Also, all databases files stay closed.
SQL> startup mount
- The instance is started and the pfile/spfile is read. So all init parameters are known
to the instance, like for example SGA parameters.
- The controlfile is opened and read, so the instance "knows" all locations of all database files.
- But, all databases files stay closed.
Usually, this is the state is where you begin a RMAN restore/recovery session,
if for example, you have lost database files, but the controlfiles and online logs are still good.
SQL> startup
- The instance is started and the init.ora/spfile.ora is read.
- The controlfile is opened and read.
- All database files are opened, and the database is ready for use.
Sometimes you start an instance and let it read the controlfile, and then perform some
further configuration (for example, if you need to configure archive mode.)
From that phase, it is easy to open the database and enter the production state.
- Suppose you first started the instance (and let it read the controlfile):
SQL> startup mount
- Next, you want to open the database and make it ready for use:
SQL> alter database open;
26. A FEW 9i,10g,11g RMAN NOTES:
You might consider this section only as a very "light" and simple step-up to RMAN.
26.1 OVERVIEW:
RMAN is considered to be the most important backup/recovery tool for Oracle databases.
With rman, you can make full, or incremental, backups of an open and online database, if that database
is running in archive mode
Alongside to creating a backup of the database, you can backup the "archived redologs" as well (often done in
the same script).
Although graphical interfaces exists to "RMAN" (like the the "Enterprise Manager"), many DBA's just use
it from the OS prompt, or use it from (scheduled) OS shell scripts.
You can use the "rman" prompt tool, just from the OS commandline, like
% rman (on unix/linux)
C:\> rman (on Windows)
This will then bring you to the RMAN> prompt.
RMAN>
From here, you can issue a whole range of commands, like BACKUP, RESTORE,
RECOVER, and reporting commands like LIST, REPORT etc..
But before you can do anything with the "target" database (the database you want to backup),
you need to connect (authenticate) to the target database (and optionally to the catalog, on which more later)
RMAN maintains a record of database files and backups for each database on which it performs operations.
This metadata is called the RMAN repository.
-- The controlfile(s) of the target database, always contains the RMAN backup METADATA (repository).
-- Optionally, you can have a separate dedicated (rman) database, which is called "the catalog".
Having a seperate, dedicated RMAN catalog database, can be handy of you have a lot of databases,
and you want some "central storage" for all metadata (which you can query for all sorts of admin info)
But, the controlfile of each target database, will also hold it's metadata, and even is leading information.
Note: the catalog does not even be a dedicated database: even a dedicated "tablespace" in some database,
might be sufficient.
So, before you can "work" with RMAN, or planning to do "something" with the target, you need to connect
to the target, and optionally also to the "catalog" (if you use one).
So, to connect to the target database (and optionally, the catalog) here are a few examples:
Here we assume that database "PROD" is the target database.
$ export ORACLE_SID=PROD
$ rman
RMAN> connect target /
RMAN> connect target system/password@SID
RMAN> connect target system/password@SID catalog rman/rman@RCAT
In the first example, we just connect (using os authentication) to the target (and we do not have
a separate catalog database).
In the second example, we connect as user "system" to the target (and we do not have
a separate catalog database).
In the last example, we connect to the target as system, and apparantly we connect to the catalog database (RCAT)
using the account "rman".
Or you can also call rman from the prompt, and pass connect parameters on the same commandline, like:
$ rman target sys/password@PROD catalog rman/rman@RCAT (unix)
or
C:\> rman target sys/password@PROD catalog rman/rman@RCAT (windows)
Once connected, you could use commands like:
RMAN> backup database;
or
RMAN> backup incremental level 0 database;
Both commands do the same thing: we used the backup command, to make a full database backup
(full is equivalent to "incremental level 0").
An "rman script" could look like this:
run {
allocate channel t1 device type disk FORMAT '/backups/ora_df%t_s%s_s%p'';
backup incremental level 0 database;
release channel t1;
}
As you can see, an rman script starts with "run", followed by related statements between { }.
First, you might define one ore more disk (or tape) "channels", which are server sessions.
In the allocate channel command, you also see the "format" (or location) as to where the backups should be stored.
However, it's much more common to have that configured as a socalled persistent setting, like in the following command:
RMAN> CONFIGURE CHANNEL DEVICE TYPE DISK FORMAT '/backups/ora_df%t_s%s_s%p';
The "body" of the script are ofcourse the backup statements (database, or archive logs, or other objects).
Then, if you have opened channels, you also close the channels, so the server sessions will exit.
Such a script as shown above, you could type in from the rman prompt, and after you have entered the last
"}", it will execute.
Ofcourse, you can place such a script in a shell script as well.
26.2 SOME PERSISTENT RMAN CONFIGURATION SETTINGS:
The script shown above, is for certain situations, quite incomplete
You know that you need to backup the archived redologs as well. And having a "controlfile" backup, is critical.
You can configure RMAN to use certain settings, which are then persistent over it's sessions.
If you want to view the current settings, use the "SHOW ALL" command, as in:
RMAN> show all;
This will show you a list of all current settings.
One important setting is the "controlfile autobackup" setting. You might find from the list, that it's "OFF".
If you switch it to "ON", then every RMAN backup, will also include the most current controlfile as a backup.
Normally, that would be great. As an alternative, you can put a controlfile backup as the last statement
in your script, but that's quite cumbersome.
Here are a few examples on how to set the persistent configuration (stored in the metadata repository):
RMAN> configure controlfile autobackup on;
RMAN> configure default device type to disk;
RMAN> configure channel device type disk format '/dumps/orabackups/backup%d_DB_%u_%s_%p';
But if you want, you can always overide some setting, in some of your scripts, like for example the
where on disk the backups are stored:
RUN
{
ALLOCATE CHANNEL disk1 DEVICE TYPE DISK FORMAT '/disk1/%d_backups/%U';
ALLOCATE CHANNEL disk2 DEVICE TYPE DISK FORMAT '/disk2/%d_backups/%U';
ALLOCATE CHANNEL disk3 DEVICE TYPE DISK FORMAT '/disk3/%d_backups/%U';
BACKUP DATABASE;
RELEASE CHANNEL disk1;
RELEASE CHANNEL disk2;
RELEASE CHANNEL disk3;
}
Note that here the backup is "spreaded" along several backup disks, shortening overall runtime
More on channels:
Manually allocated channels (allocated by using ALLOCATE) should be distinguished from automatically
allocated channels (specified by using CONFIGURE). Manually allocated channels apply only to the RUN job
in which you issue the command. Automatic channels apply to any RMAN job in which you do not manually
allocate channels. You can always override automatic channel configurations by manually allocating channels within a RUN command.
This explains why you will not alwayssee an "allocate channel" command in a run job.
26.3 SOME SIMPLE RMAN BACKUP EXAMPLES:
Here are just a few RMAN backup script examples.
Examples 1 and 2 are old, traditional examples, not using incremental backups.
Here, we just make a full backup of the database, and backup all archived redologs.
This works, but most will agree that using incremental backups might be very beneficial.
Traditional 9i style rman backup scripts:
Example 1: rman script
RMAN> run {
allocate channel t1 type disk FORMAT '/disk1/backups/%U';
backup database tag full_251109 ; You may also "tag" (or name) a backup
sql 'alter system archive log current'; # Just before backup, let's archive the current redolog
backup archivelog all delete input ; # Are you sure to delete all archives after backup ?
release channel t1;
}
Example 2: rman script (using sbt, or that is,"tape")
RMAN> run {
allocate channel t1 type 'sbt_tape' parms 'ENV=(tdpo_optfile=/usr/tivoli/tsm/client/oracle/bin64/tdpo.opt)';
backup database tag full_251109 ;
sql 'alter system archive log current';
backup archivelog all;
release channel t1;
}
10g style rman backup scripts:
On 10g/11g, you can still use backups scripts as shown in examples 1 and 2.
But, examples 3 and 4 are a bit more "modern", and might be a better solution in many situations.
It uses incremental backups.
An incremental backup, contains all changed blocks, with respect to the former backup.
So, if you make a full backup (level 0), at time=t0, and some time later an incremental backup (level 1) at time=t1,
the latter backup will contain all changes that a possible large number of archived redologs will hold as well,
during the interval t1-t0.
It means you do not have to have so much "attention" to those archived redologs (they are still important ofcourse).
Only the archived redologs that were created after the level 1 backup, are important for full recovery.
Example 3: level 0 rman script (full backup)
RMAN> run {
backup incremental level 0 as compressed backupset database;
}
Note that the basic command is "BACKUP DATABASE", but all sorts of options can be placed in between
those keywords (BACKUP and DATABASE). Here, we have specified to compress the full backup.
Example 4: level 1 rman script (incremental backup)
RMAN> run {
backup incremental level 1 as compressed backupset database;
}
A full database backup, corresponds to an INCREMENTAL LEVEL 0 backup.
An incremental backup, corresponds to an INCREMENTAL LEVEL 1 backup.
An incremental LEVEL 1 backup, will only backup the changed database blocks that have been changed since
the former LEVEL 0 or LEVEL 1 backup.
So, in fact with an incremental level 1, you only capture all changes compared
to the former backup (level 0 or level 1).
RMAN will always chooses incremental backups over archived logs,
as applying changes at a block level is faster than reapplying individual changes.
Specifying the default backup locations for disk backups:
--> Not using a Flash Recovery Area (10g) or Fast recovery Area (11g):
You might wonder where the disk based backups will be stored, since the allocate channel statement
usually does not refer to a disk location.
It's usually handled by setting a persistent rman setting like for example:
RMAN> CONFIGURE CHANNEL DEVICE TYPE DISK FORMAT '/backup/ora_df%t_s%s_s%p';
Here you see the location sepcified as "/backup", while some additional file parameters
determine the format of a 'backup piece', like %t is replaced with a four byte time stamp, %s
with the backup set number, and %p with the backup piece number.
You can also configure an ASM disk group as your destination, as in the following example:
RMAN> CONFIGURE CHANNEL DEVICE TYPE DISK FORMAT '+dgroup1';
--> Using a "Flash Recovery Area" (10g) or "Fast recovery Area" (11g):
Then this will be the default location for all your RMAN backups, unless you override it.
Example 5: unix shell script using rman in the traditional way.
#!/usr/bin/ksh
export ORACLE_SID=PROD
export ORACLE_HOME=/opt/oracle/product/10.2
# Add date to be used in logfile
export TDAY=`date +%a`
export backup_dir = /dumps/oracle/backup
export LOGFILE=$backup_dir/prod.log
echo "Backup Started at `date` \n" >$LOGFILE
$ORACLE_HOME/bin/rman <<'!' 1>> $LOGFILE 2>&1
# connect to the database. Change this to Sys logon if not using /
connect target /
# Allocate Disk channels. You might allocate more if you have sufficient resources:
run {
allocate channel t1 type disk;
allocate channel t2 type disk;
#backup the whole source database.
# Use tags for easy identification from other backups
backup tag whole_database_open format '$backup_dir/df_%u' database;
# archive the current redologfile
sql 'alter system archive log current';
#backup the archived logs
backup archivelog all format '$backup_dir/al_%u';
# backup a copy of the controlfile that contains records for the backups just made
backup current controlfile format '$backup_dir/cf_%u';
}
exit
echo "Backup Finished at `date` \n" >>$LOGFILE
26.4 SOME SIMPLE RMAN RESTORE AND RECOVERY EXAMPLES:
RMAN has it's metadata, and thus it "knows" what "to do" when you need to restore and recover a database.
Especially in 11g, the graphical Enterprise Manager (EM), has some really nifty features to get you
out of trouble when a restore and recovery is needed. But working from the EM is not a subject in this document.
Again, if restore and recovery subjects are important for you (which is true if you are a DBA),
and you use 11g, then you should investigate all options that are available in 11G EM.
Here we will only show a few simple and traditional examples using RMAN for a restore and recovery.
PART 1. COMPLETE RECOVERY:
Example 1: Restore and Recovey of an entire database (database files only):
Important: we still have the controlfiles. Only databasefiles are lost.
Suppose you have crash of some sort, like a diskcrash. If the controlfiles and online redo logs are still present,
a whole database recovery can be achieved by running the script below.
If you have also lost all controlfiles and online redologs, the restore will be a little more involved,
than what is shown below.
run {
startup mount;
restore database;
recover database;
alter database open;
}
Explanation:
Since the database is damaged (like missing dbf files), you cannot open the database.
Anyway, it should not be openened (and ofcourse it cannot be openened). Suppose you want to restore
over corrupt files, then those files should not be active in anyway.
But we still need the "Instance" to be up, and that will be achieved using "startup mount".
Note that starting the instance using "startup mount", implies that a good controlfile is available,
and at the same time, that command will not open the database.
Next, we use the "restore database" command. Since RMAN knows where to find all backups,
it will apply the last full backup, and if present, it then applies the differential backups.
After all of the above is ready, the database is very likely to be in an inconsistent state, and the last
archived redologs needs to be applied. This is called "recovery".
In some cases, it might also be that after the full backup restore, and optionally the differential backup restore,
that no archived redologs need to be applied, and the last step will then be that the recovery process
uses the "online" redologs for the last steps of recovery.
Obviously then, in this case, the last differential backup that was performed, already contained almost
all change vectors, so for the last step, rman uses the online logs for the latest transactions.
Example 2: Restore and Recovery of a tablespace (except system or undo):
Important: We still have system, undo, redo, and controlfiles. Only database files of a tablespace are lost.
Suppose you have a problem with the SALES tablespace. If you need to restore it, you can use a script
similar to what is shown below.
If it is just an ordinary user tablespace, the database itself can stay online and open.
But, that particular tablespace needs to be in a closed state, before you can restore it.
run {
sql 'ALTER TABLESPACE SALES OFFLINE IMMEDIATE';
restore tablespace SALES;
recover tablespace SALES;
sql 'ALTER TABLESPACE SALES ONLINE';
}
PART 2. INCOMPLETE RECOVERY:
As you would expect, RMAN allows incomplete recovery to a specified date/time, SCN or sequence number.
Important: we still have the controlfiles and redologs. Only databasefiles are lost.
In this case, the database gets restored to a time prior to changes that are stored in the online redologs.
RMAN will make the database consistent, after restore and recovery, but the restored databases lives with
a max System Change Number (SCN) that is lower than the SCN at the time of crash.
Since in all restore scenario's sofar in this note, we have assumed that the "online redologs" were not affected
by the crash, and only database files are corrupt or missing (possibly due to a diskcrash).
So, the online redologs are "more in the future" than the restored database files.
This situation must be resolved by clearing, or resetting, the online redologs.
run {
startup mount;
set until time 'Nov 15 2008 09:00:00';
# set until scn 1000; # alternatively, you can specify SCN
# set until sequence 9923; # alternatively, you can specify log sequence number
restore database;
recover database;
alter database open resetlogs;
}
26.5 SOME NOTES ON "BACKUP SET" AND "COPY":
Format of the backup:
Usually, what you will create for backups using RMAN, will be "backup sets".
But, actually, you can create either "backup sets" or "image copies".
- Backup sets are logical entities produced by the RMAN BACKUP command. It is stored in an rman specific format,
and will only contain the used blocks of the datafiles, thereby saving space.
- Image copies are exact byte-for-byte copies of files. It does not save in space the way a backup set does.
RMAN will create "image copies", when you use the "AS COPY" option with the BACKUP command.
Both Backup sets and image copies are recorded in the RMAN repository.
As said before, usually the default type of "backup set" will be used by rman.
Image copy backups, can only be created on disk.
If you want to change the "default" type, you can use commands like:
RMAN> CONFIGURE DEVICE TYPE DISK BACKUP TYPE TO COPY; # image copies
RMAN> CONFIGURE DEVICE TYPE DISK BACKUP TYPE TO BACKUPSET; # uncompressed backupset
Some examples:
You do not need to use the rman script structure (run { statements }), but you can use direct commands as well.
Returning to the differences of creating "image copies" or "backup sets", here are a few examples:
RMAN> BACKUP AS COPY DATABASE; #image copies
RMAN> BACKUP DATABASE; # backup set
26.6 SPECIFYING THE BACKUP LOCATIONS:
Using Persistent settings:
We already have seen that using 'persistent' configuration settings, you can determine where
per default the backups will be stored, like for example:
RMAN> CONFIGURE CHANNEL DEVICE TYPE DISK FORMAT '/backups/%U';
RMAN> CONFIGURE CHANNEL DEVICE TYPE DISK FORMAT 'c:\rbkup\data_%s_%p_%U.bak';
RMAN> CONFIGURE CHANNEL DEVICE TYPE DISK FORMAT '+dgroup1';
RMAN> CONFIGURE CONTROLFILE AUTOBACKUP ON;
RMAN> CONFIGURE CONTROLFILE AUTOBACKUP FORMAT FOR DEVICE TYPE DISK TO '/controlbck/cf%F';
If you have set similar settings as above, you do not need to specify locations in the backup commands and scripts.
Specifically, if you specify explicitly a channel in the run block (allocate channel t1 DEVICE type DISK;)
without the FORMAT specification, then your scripts might fail.
So, or use FORMAT in the persistent settings, or use a complete FORMAT in the ALLOCATE/CONFIGURE channel, or
use a complete FORMAT in the BACKUP command.
Using the FORMAT clause:
You can also specify a FORMAT clause with the individual BACKUP command to direct the output
to a specific location of your choice, like for example:
BACKUP DATABASE FORMAT="/backups/backup_%U";
Backups in this case are stored with generated unique filenames in the location /backups/.
That notice that the %U, used to generate a unique string at that point in the filename, is required.
You can also use the FORMAT clause to backup to an ASM diskgroup. like so:
RMAN> BACKUP DATABASE FORMAT '+dgroup1';
Because ASM controls all filenames, you do not need to specify names any further.
27. HOW TO SEE IF THE DATABASE IS DOING A LARGE ROLLBACK:
Remember, this note is about SQL only, and does not say anything about using Graphical tools like the EM.
If you have a large transaction, that gets interrupted in some way, and the database will then
rollback from the UNDO tablespace, it would be nice to see where it "is now" and how much
undo blocks "are still to go".
One way to see that is using the following query. You will see the number of undo blocks gets lower
and lower as time pass by.
SELECT a.sid, a.saddr, b.ses_addr, a.username, b.xidusn, b.used_urec, b.used_ublk
FROM v$session a, v$transaction b
WHERE a.saddr = b.ses_addr;
This is the same query as was already shown in section 3.4
28. A FEW SIMPLE WAYS TO CLONE A 10g/11g DATABASE:
Problem:
Suppose on Server "A" you have the database "PROD10G" running. This is the "source" database.
Now, you want to quicly "clone" that database to Server "B",
where it will use the databasename "TEST10G".
Here we assume that Server B also has Oracle installed, which is on the same level as on Server A.
There are at least 4 methods available, namely:
- 1. using the good old "create controlfile" statement,
- 2. using the "expdp" datapump utility,
- 3. cloning using RMAN,
- 4. using "transportable tablespaces" method.
Here, we will only touch on methods 1&2&3.
Method 1: using the "create controlfile" statement.
Here we are not using RMAN, or exp, or expdp, to clone the database. Assuming the database is down,
We "simply" use scp (or other copy tool), to copy all database files from ServerA to ServerB.
Then, we use a script, containing the CREATE CONTROLFILE command, to "revive" the database on the other Server.
One drawback is, that the source database needs to be shutdown before the copy phase takes place,
in order to have consistent files. So, here we have a cleanly shutdown database, and thus
we deal with "cold" database files, which we can easily copy from one Server to the other Server.
Note:
A similar, but more elaborate, procedure can even be followed using an open database in archive mode.
But, since this is a bit cumbersome, alternatives using "expdp/impdp", or using RMAN, are just simply better.
- On Server B, create a similar directory structure to hold the clone's database files, and logfiles.
For example, that could be something like "/data/oradata/test10g" for the database files,
and something like "/data/oradata/admin/test10g" to hold the bdump, cdump, pfile, adump directories.
- Create an init.ora file for TEST10G, using the init.ora of PROD10G. Ofcourse, you need to edit
that init.ora later on, so that it correctly has the right databasename, and filesystem paths.
If you don't have an init.ora, then you surely have the spfile.ora of PROD10G.
Then, simply create an init.ora, using a similar statement as was shown in section 10, like for example:
CREATE PFILE='/tmp/init.ora'
FROM SPFILE='/data/oradata/admin/prod10g/pfile/spfile.ora';
- copy the init.ora file over to Server B, using "scp" (or similar command),
to for example "/data/oradata/admin/test10g/pfile".
scp init.ora oracle@ServerB:/data/oradata/admin/test10g/pfile
- On ServerB, edit the init.ora and change stuff like the database name, the filepaths of the (to be created),
controlefiles, the location of the "background_dump_dest" etc..
- On ServerA, the source machine, now let's create the "CREATE CONTROLFILE.." script.
Start a sqlplus session, logon, and use the statement:
ALTER DATABASE BACKUP CONTROLFILE TO TRACE AS '/tmp/cc.sql';
This will produce an ascii file, which is editable.
- copy the newly created script over to ServerB, for example to the directory
where the databasefiles will also be stored:
scp cc.sql oracle@ServerB:/data/oradata/test10g
- On ServerB, edit the cc.sql script:
Usually, the script has two large similar sections, which almost are identical.
If you do not know what a mean, then just browse through the script. But maybe you only have one section.
Anyway, just leave one block and get rid of all comments.
Also, change all filepaths to resemble the new situation at ServerB.
Especially, you need to DELETE the last lines which should resemble this:
RECOVER DATABASE USING BACKUP CONTROLFILE
ALTER DATABASE OPEN RESETLOGS;
Make sure that those two lines are gone. Also, don't have any blank lines in the script.
Get rid of the STARTUP NOMOUNT command too.
Your create controlfile script should resemble the one that's shown below:
CREATE CONTROLFILE SET DATABASE "TEST10G" RESETLOGS NOARCHIVELOG
MAXLOGFILES 16
MAXLOGMEMBERS 3
MAXDATAFILES 100
MAXINSTANCES 8
MAXLOGHISTORY 292
LOGFILE
GROUP 1 '/data/oradata/test10g/REDO01.LOG' SIZE 50M,
GROUP 2 '/data/oradata/test10g/REDO02.LOG' SIZE 50M,
GROUP 3 '/data/oradata/test10g/REDO03.LOG' SIZE 50M
DATAFILE
'/data/oradata/test10g/SYSTEM01.DBF',
'/data/oradata/test10g/UNDOTBS01.DBF',
'/data/oradata/test10g/SYSAUX01.DBF',
'/data/oradata/test10g/USERS01.DBF',
'/data/oradata/test10g/EXAMPLE01.DBF'
CHARACTER SET WE8MSWIN1252
;
Ofcourse, you may have a lot more datafiles and redologs than my simple example. But make sure, the "structure"
really resembles the structure as shown above, and that there are no blank lines, and that the script just starts
with "CREATE CONTROLFILE..", and that the "RECOVER DATABASE USING BACKUP CONTROLFILE" and "ALTER DATABASE OPEN RESETLOGS"
lines are NOT there.
Note the "SET DATABASE" keywords, because that's how you can change a Database name.
Also note, that at the destination Server, the datadirectories does not HAVE to be exactly the same
as it is on the source Server. For example, if the source machine uses oracle datadirectories like
/u01/data, /u02/data, /u03/data etc.., but you do not have that structure on the destination,
then simply edit the "CREATE CONTROLFILE" script to reflect the correct directories used
at the destination Server.
- Now its time to copy the databasefiles of PROD10G on ServerA.
Start a sqlplus session and logon. Shutdown the database cleanly using:
SQL> shutdown immediate;
After the database has been closed, copy all databasefiles (except controlfiles) to ServerB.
scp * oracle@ServerB:/data/oradata/test10g/
Here I copied all files (database, redolog, and controlfiles) to SeverB.
At ServerB, I can just delete the controlfiles after the copy is ready.
As a last check, check the permissions on the files and directories.
If that's all OK, and the init.ora is OK as well, we can execute the CREATE CONTROLFILE script.
On ServerB:
- Go to the database data directory
cd /data/oradata/test10g
- Set the SID to point to TEST10G:
export ORACLE_SID=TEST10G
- Start sqlplus.
sqlplus /nolog
SQL> connect / as sysdba
- Start the instance using the new init.ora file, but do not mount the database:
SQL> startup nomount pfile='/data/oradata/admin/test10g/pfile/init.ora'
- One the instance has started, let's create the controlfile:
SQL> @cc.txt
Control file created.
Were done ! The TEST10G database is created and opened.
If you have errors, it's usually due to wrong directories and names in the init.ora file, or in the script.
Note: notice that I first went to the datadirectory, where I stored the "cc.sql" script as well as the databasefiles.
This avoids a possible error with terminal/character settings, because sometimes it is seen that executing
a script in the form of "@\path\script" where the "@\" works not properly.
Windows:
The above example works not only in Unix environments, but for example on Windows as well.
Only, in Windows you also need to create an Instance first, before you execute any script.
This is so, because in Windows, any instance is equivalent to a Windows "service".
In Windows, use a command similar to the example below, first.
C:\> oradim -new -sid TEST10G -INTPWD mypassword -STARTMODE AUTO
Cloning a 11g database to another Server:
The procedure is almost identical to what we have seen above.
However, there are a few things to take into account.
1. ADR:
Only, you need to take the new DIAGNOSTICS paradigm into account.
Instead of the 9i or 10g like "bdump", "cdump" etc.. log/trace directories, Oracle 11g uses "ADR",
which is short for Automatic Diagnostic Repository.
The alert log and all trace files for background and server processes are written to the
Automatic Diagnostic Repository (ADR), the location of which is specified by the DIAGNOSTIC_DEST
initialization parameter.
2. Fast Recovery Area:
The Flash Recovery area, is now called the Fast recovery Area.
Ofcourse, if you create an init.ora from an 11g spfile.ora, you would have seen those differences,
and you automatically would have created the neccessary structures on the target machine.
Note that in this procedure, we had the "luxury" to shutdown the source database, so that
we have a fully consistent set of files, which we copied over to ServerB.
After the copy to ServerB is ready, the original database can be immediately brought online again.
So, in this case, we do not need to RECOVER anything.
If you cannot close the source database, because it's strictly 24 x 7, or the filecopy is expected
to take too much time, then you can consider an RMAN, or an expdp based cloning procedure.
Method 2: using the "expdp" and "impdp" utilities.
In this method, the source database stays open and online. However, if it is anticipated
that a huge amount of data is involved, and you might not have sufficient space for the
exportfile, you might consider option 2.3, which avoids using a dump file altogheter.
However, using expdp and impdp in the traditional way, that is, using dumpfiles, then
Oracle needs a "directory" object. It is a true location on a filesystem, which
simply needs to be "registered" in the Oracle metadata.
Just select a suitable location on some filesystem. In the examples below, I just used
the "/home/oracle/dump" directory.
Keep in mind that the directory needs sufficiently free space, enough to hold the
exportfile (at source and destination Server).
- Registering the directory within Oracle (at target and destination Server):
SQL> CREATE OR REPLACE DIRECTORY BACKUPDIR AS '/home/oracle/dump';
SQL> GRANT ALL ON BACKUPDIR TO PUBLIC; -- only for test, otherwise tighten security.
using the "expdp" and "impdp" utilities, here too, we can distinguish between several cases.
2.1 Exporting and importing to the same schema:
If the database objects (tables, indexes, packages etc..) are effectively residing
in one schema (account), we can choose to export and import the whole database,
or just the objects (and data) of that one schema. In this case, we expdp just that schema.
Here, we shall do the latter.
- On both Servers, if needed, create a directory object similar as to what was shown above.
- On the target, create the Oracle database with tablespaces similar as to what the source has.
This should not be too much work, since a database and it's objects can be simply scripted
with toad or other utilities.
- Create the same schema at the target Oracle install. Suppose the schema is "HR".
- At the source machine, logon as user oracle and check if the $ORACLE_HOME and $ORACLE_SID
environment variables are in place.
- Create the export:
$ expdp system/password@SID schemas=HR directory=BACKUPDIR dumpfile=HR.dmp logfile=expHR.log
- From serverA, scp the HR.dmp file to serverB, for example like so:
[oracle@ServerA /home/oracle/dump $] scp HR.dmp oracle@ServerB:/home/oracle/dump
- At the destination Server, logon as oracle and check the environment variables.
- Perform the import:
$ impdp system/password@SID schemas=HR directory=BACKUPDIR dumpfile=HR.dmp logfile=impHR.log
- Scan the "impHR.log" logfile for errors.
2.2 Exporting and importing to different schema's:
If the database objects (tables, indexes, packages etc..) are effectively residing
in one schema (account), we again can simply expdp just that one schema.
However, in many cases it is desired that at the target Server, a different schema
should be used. This is no problem. We can follow all of the above, with the exception
of the statements as shown below.
Suppose the source schema is called "HR", and the schema at the target is called "HR2".
- Create the export:
$ expdp system/password@SID schemas=HR directory=BACKUPDIR dumpfile=HR.dmp logfile=expHR.log
- From serverA, scp the HR.dmp file to serverB, for example like so:
[oracle@ServerA /home/oracle/dump $] scp HR.dmp oracle@ServerB:/home/oracle/dump
- At the destination Server, logon as oracle and check the environment variables.
- Perform the import:
$ impdp system/password@SID directory=BACKUPDIR dumpfile=HR.dmp logfile=impHR2.log REMAP_SCHEMA='HR':'HR2'
With the old "exp" and "imp" utilities, at using "imp", you could use the "FROMUSER" and "TOUSER"
clauses, in order to import the objects and data to another schema.
For the same purpose, with "impdp", use the "REMAP_SCHEMA" clause.
2.3 Exporting and importing using the network:
In sections 2.1 and 2.2, we used "expdp" on the source Server to create an intermediate dumpfile.
Next, we needed to transfer that dumpfile from the source Server to the destination Server.
Next, we used "impdp" on the destination Server, using the copy of that dumpfile.
There might be various reasons why you can't or do not want to use an intermediate dumpfile
at all.
This is indeed possible. All we need to do is create a "database link" on the destination Server,
that "points" to the Oracle instance at the source Server.
In section 7.8, we have seen a simple example of such a "database link".
If needed, take a look at section 7.8 again.
To apply it in our situation, we should use a procedure like the following:
At the destination Server Instance, create a database link which uses the schema at the source instance.
For example:
SQL> create database link HRLINK connect to HR identified by password using 'sourcedb';
Working from the destination server instance, it should now already be possibly to query
the tables and views which reside in the HR schema, in the source instance.
Now, let's do the import:
$ impdp system/password@SID DIRECTORY=BACKUPDIR NETWORK_LINK=HRLINK remap_schema=HR:HR2
Method 3: using the RMAN "duplicate database" command.
You can use RMAN to simply duplicate a database to some target instance
on a second Server.
Although the method is originally intended to create a Standby database in DataGuard, we can also
use it to simply duplicate a database, and not configure anything furher for Dataguard.
Suppose you have Server1, with an instance supporting the DB1 database.
Now, on Server 2, you have installed the Oracle database software too.
Suppose it's your intention to create a DB2 database, on Server2, which is a copy of DB1.
The following method might work for you. The next basic listing probably needs some refinement,
but the "skeleton" of the method is like this:
!! Important: try this first on two Test Servers !!
- Make or modify the SQLNet files (tnsnames, listener) on both Servers, so that in principle
DB1 can "reach" DB2, and the otherway around, using SQLNet identifiers.
- Copy the init.ora of SRCDB to Server2, to the same location. See section 10 to find out
how to create an init.ora from a spfile.ora.
- Create a directory structure on Server2, similar to what exists on Server1, with respect to
database files, logfiles etc..
- On Server2, you also use the same "oracle" account and group (uid,gid), just as it is on Server1.
- chown all datadirectories etc.. to the user:group, just as it is on Server1.
- On Server 2, edit the "init.ora" to reflect the situation as it will be on Server2, that is,
database name, controlfile locations, etc..
- It would be great if you already used a password file on Server1. If so, create one too on Server2
using the same password for sys.
- start the "auxilary instance" on Server2, using "startup nomount pfile=path_to_pfile"
- Now start an RMAN session like so:
RMAN> connect target sys@DB1
RMAN> connect catalog catalogowner@catalogdb
RMAN> connect auxiliary sys@DB2
RMAN> duplicate target database for standby from active database;
Due to the "for standby" keywords, the database will get a unique DBID.
Per default, RMAN does not recover the database. Use the DORECOVER option of the DUPLICATE command
to specify that RMAN should recover the standby database.
Or you can recover using archived logs.
In an RMAN For using the active database option, in a Data Guard setup, a script like below can be used:
RMAN> DUPLICATE TARGET DATABASE FOR STANDBY FROM ACTIVE DATABASE
DORECOVER
SPFILE
SET "db_unique_name"="SOUTH" COMMENT ''The Standby''
SET LOG_ARCHIVE_DEST_2="service=SOUTH ASYNC REGISTER
VALID_FOR=(online_logfile,primary_role)"
SET FAL_SERVER="CENTRAL" COMMENT "Is primary"
NOFILENAMECHECK;
29. A FEW NOTES ON 10G/11G ADDM and AWR:
29.1 ADDM, AWR and ASH: What is it?
Oracle Diagnostics Pack 11g (and 10g) includes a self-diagnostic engine built right into the
Oracle Database 11g kernel, called the "Automatic Database Diagnostic Monitor" ADDM.
To enable ADDM to accurately diagnose performance problems, it is important that
it has detailed knowledge of database activities and the workload the database is
supporting. Oracle Diagnostics Pack 11g (and 10g), therefore, includes a built in repository
within every Oracle 11g (and 10g) Database, called "Automatic Workload Repository" (AWR),
which contains operational statistics about that particular database and other relevant
information. At regular intervals (once an hour by default), the Database takes a
snapshot of all its vital statistics and workload information and stores them in AWR,
and retains the statistics in the workload repository for 8 days.
Also, by default, ADDM runs every hour to analyze snapshots taken by AWR during that period.
Per default, all AWR objects are stored in the SYSAUX tablespace.
Note: for people familiar with older Oracle versions: ADDM and AWR resembles an strongly enhanced
and automatically implemented "STATSPACK".
So, ADDM examines and analyzes data captured in the Automatic Workload Repository (AWR) to determine
possible performance problems in Oracle Database. ADDM then locates the root causes of the performance problems,
provides recommendations for correcting them, and quantifies the expected benefits.
A key component of AWR, is Active Session History (ASH). ASH samples the
current state of all active sessions every second and stores it in memory. The data
collected in memory can be accessed by system views. This sampled data is also
pushed into AWR every hour for the purposes of performance diagnostics.
Gathering database statistics using AWR is enabled by default and is controlled by the STATISTICS_LEVEL initialization parameter.
The STATISTICS_LEVEL parameter should be set to TYPICAL or ALL to enable statistics gathering by AWR.
The default setting is TYPICAL. Setting the STATISTICS_LEVEL parameter to BASIC disables many Oracle Database features,
including AWR, and is not recommended.
Overview Architecture:

29.2 Relevant INITIALIZATION Parameters:
1. 10g/11g: STATISTICS_LEVEL
STATISTICS_LEVEL = { ALL | TYPICAL | BASIC }
Default: TYPICAL
STATISTICS_LEVEL specifies the level of collection for database and operating system statistics.
The Oracle Database collects these statistics for a variety of purposes, including making self-management decisions.
The default setting of TYPICAL ensures collection of all major statistics required for database
self-management functionality and provides best overall performance.
When the STATISTICS_LEVEL parameter is set to ALL, additional statistics are added to the set of statistics
collected with the TYPICAL setting. The additional statistics are timed OS statistics and plan execution statistics.
Setting the STATISTICS_LEVEL parameter to BASIC disables the collection of many of the important statistics
required by Oracle Database features and functionality.
2. 11g: CONTROL_MANAGEMENT_PACK_ACCESS
The CONTROL_MANAGEMENT_PACK_ACCESS parameter (11g, not 10g) specifies which of the Server Manageability Packs should be active.
- The DIAGNOSTIC pack includes AWR, ADDM, and so on.
- The TUNING pack includes SQL Tuning Advisor, SQLAccess Advisor, and so on.
A license for DIAGNOSTIC is required for enabling the TUNING pack.
CONTROL_MANAGEMENT_PACK_ACCESS = { NONE | DIAGNOSTIC | DIAGNOSTIC+TUNING }
Default: DIAGNOSTIC+TUNING
If set to NONE, those features are switched off.
29.3 How you can Interact or use ADDM:
- Using Enterprise Manager Grid or DB Control
- Using PLSQL API DBMS packages
- Ready supplied scripts (that will ask for parameters, for example start and end snapshot id's)
like the script "@?/rdbms/admin/addmrpt"
- View the many DBA_ADDM* and DBA_ADVISOR* views
=> Using the Enterprise Manager is the most easy way. Here you can immediately see the "ADDM findings", as shown
in the figure below. Also, using the EM, you can create and otherwise manage AWR snapshots.
Using ADDM via the Enterprise Manager :

=> Using PLSQL API DBMS Packages:
There are many packages for controlling ADDM and AWR.
Here is a very simple example on how to analyze the database, using two snapshots, and how to retrieve
the report.
DBMS_ADDM.ANALYZE_DB (
task_name IN OUT VARCHAR2,
begin_snapshot IN NUMBER,
end_snapshot IN NUMBER,
db_id IN NUMBER := NULL);
var tname VARCHAR2(60);
BEGIN.
:tname := 'my_database_analysis_mode_task';
DBMS_ADDM.ANALYZE_DB(:tname, 11, 12);
END.
To see a report:
SET LONG 100000
SET PAGESIZE 50000
SELECT DBMS_ADDM.GET_REPORT(:tname) FROM DUAL;
30. A FEW connect STRING EXAMPLES:
Just a few examples:
=> RMAN + Target database:
$ export ORACLE_SID=PROD
$ rman
RMAN> connect target /
RMAN> connect target sys/password
RMAN> connect target system/password@SID
RMAN> connect catalog username/password@catalog
RMAN> connect target system/password@SID catalog rman/rman@RCAT
$ rman target sys/password@prod1 catalog rman/rman@rcat
=> Connect database:
-> Using nolog and provide credentials later:
$ sqlplus /nolog
SQL> connect / as sysdba
$ sqlplus /nolog
SQL> connect sys/password as sysdba
SQL> connect sys/password@TEST11g as sysdba
connect / AS sysdba
connect / AS sysoper
connect /@net_service_name AS sysdba
connect /@net_service_name AS sysoper
REMOTE_LOGIN_PASSWORDFILE=exclusive
Grant user scott SYSDBA.
CONNECT scott/tiger AS SYSDBA
-> Calling sqlplus from OS prompt and provide credentials:
$ sqlplus sys/password as sysdba
$ sqlplus sys/password@SID as sysdba
$ sqlplus '/ as sysdba'
$ sqlplus username@\”myhost:1522/orcl\”
albert@"dbhost.example.com/orcl.example.com"
albert@"192.0.2.1/orcl.example.com"
albert@"[2001:0DB8:0:0::200C:417A]/orcl.example.com"
-> No tnsnames.ora:
$ sqlplus user/password@(description=(address_list=(address=.......SID)))
$ sqlplus "user/password@(DESCRIPTION=(ADDRESS=(PROTOCOL=TCP)(Host=hostname.network)(Port=1521))(CONNECT_DATA=(SID=remote_SID)))"
-> From a shell script:
$ORACLE_HOME/bin/sqlplus -s "/ as sysdba" < $tmp_file 2>1
set heading off feedback off
whenever sqlerror exit
select 'DB_NAME=' || name from v\$database;
.. # possible other stuff
exit
EOF
$ sqlplus /nolog << EOF
connect / as sysdba
startup
EOF
31. UNSTRUCTURED PLSQL .txt FILE:
Quite some time ago, I created (or compiled actually) a note that touches on PLSQL.
It's quite old, but still has quite nice info, and examples, I believe.
I you would like to try it, then use this link.
32. HOW TO SOLVE BLOCK CORRUPTION:
There are several tools to detect, and "solve", Oracle block corruptions.
Among which are:
- The "dbv" OS prompt utility, to "scan" files.
- The SQL statement "ANALYZE TABLE [table_name] VALIDATE STRUCTURE" (with optional clauses listed).
- Viewing rman or expdp logs when creating backups.
- Some v$ and DBA_ views, like "V$DATABASE_BLOCK_CORRUPTION".
- Inspecting the logging/diagnosing facility (watching ORA-600, ORA-01578, ORA-01110 entries).
- executing the PLSQL procedure DBMS_REPAIR.SKIP_CORRUPT_BLOCKS() as a quick fix.
- executing the PLSQL procedure DBMS_REPAIR.FIX_CORRUPT_BLOCKS() to try to repair.
- Using the SET EVENTs parameter to skip troublesome blocks.
- Historically, in the past you could use the "BBED" utility.
- Using smart queries to query "around" bad blocks.
- and other methods....
Quite some time ago, I created a note that touches those subjects.
It's actually targeted for 10g/11g. But if you would like to try it, then use this link.
33. BIRDS-EYE VIEW ON INSTANCE STRUCTURE AND PROCESSES:
Overview Instance structure and processes:
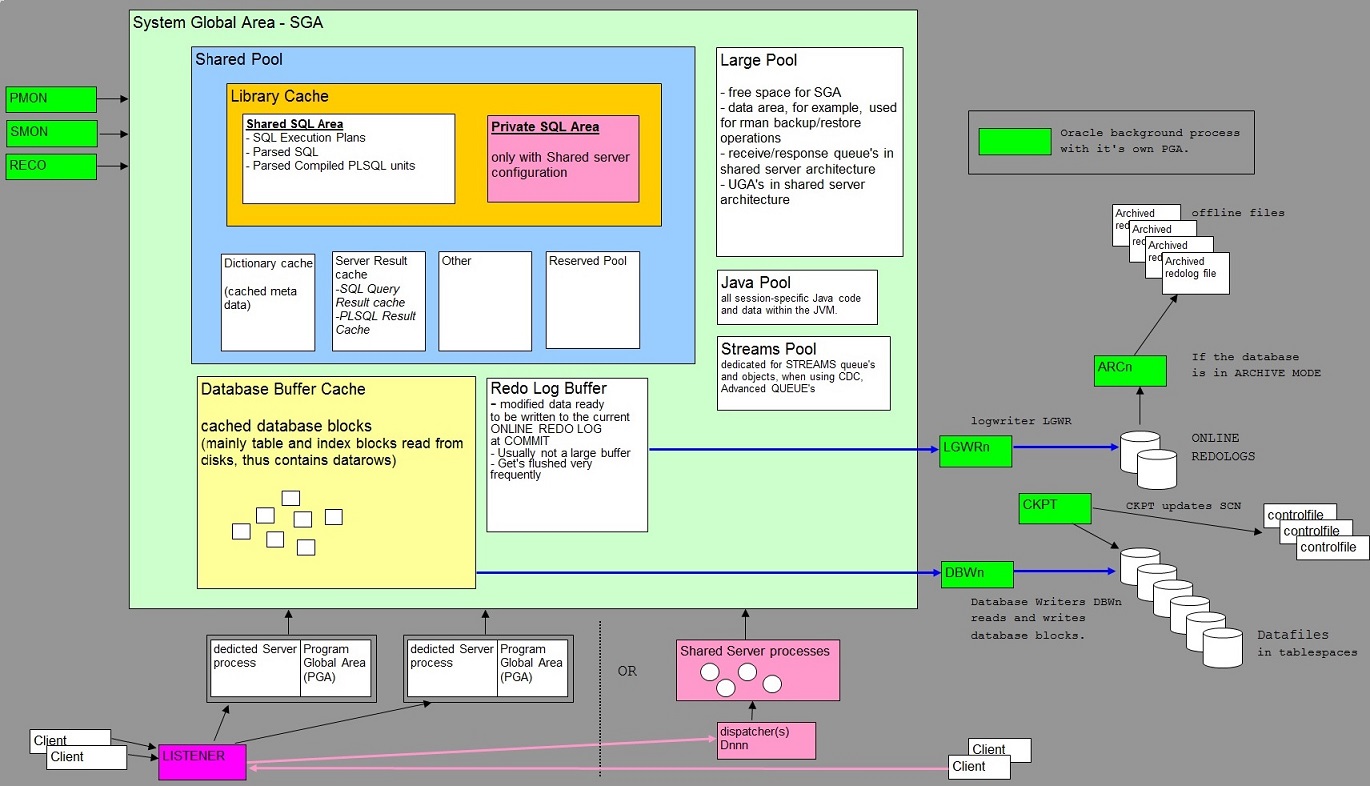
34. Appendices:
Appendix 1.
It's may look weird, but the following doc is an Excel file. It contains some facts about Oracle 10g/11g.
If you would like to try it, use this link (.xls file).
Part 2:
Main Contents Part 2: Specific 12C
35. "EM Cloud Control 12c" or "EM Database Express interface 12c":
EM Database Express:
When you have just a single instance to manage, then you can use the default
and "lightweight" webbased Enterprise Manager "Express 12c".
At the install of the database software 12c plus database, it will be setup automatically.
Use:
https://hostname:portname/em
Like https://starboss.antapex.nl:5500/em
Finding the port if you forgot it, using sqlplus:
SQL> select dbms_xdb.getHttpPort() from dual;
GETHTTPPORT
-----------
8080
SQL> select dbms_xdb_config.getHttpsPort() from dual;
GETHTTPSPORTM
------------
5500
The latter port is the https port.
Be sure that SSL and TLS is enabled in your browser.
Or use a prompt command:
$ lsnrctl status | grep -i http
C:\> lsnrctl status | find "HTTP"
EM Cloud Control 12c:
This is a more elaborate distributed environment, with Management Agents on Instances,
which collect information and communicate with the Oracle Management Service(s) (OMS), and
a central repository database.
This is the architecture of choice for larger environments.
You can connect with your browser to an Oracle Management Server and manage the environment.
Before "implementing" any of the infrastructure (oms, repository db, agents etc..),
there are "package" and kernel parameter requirements for each supported Unix or Linux OS.
See the Oracle documentation.
For any platform, specific users/groups need to be setup.
Group: oinstall
User: oracle (oracle:oinstall)
Start Cloud Control:
Starting Cloud Control and All Its Components.
=>Database:
-Set the ORACLE_HOME environment variable to the Management Repository database home directory.
-Set the ORACLE_SID environment variable to the Management Repository database SID (default is asdb).
-Start the Net Listener:
$PROMPT> $ORACLE_HOME/bin/lsnrctl start
-Start the Management Repository database instance:
ORACLE_HOME/bin/sqlplus /nolog
SQL> connect SYS as SYSDBA
SQL> startup
SQL> quit
=>OMS:
$ OMS_HOME/bin/emctl start oms
=>Agent:
$ AGENT_HOME/bin/emctl start agent
Stopping Cloud Control and All Its Components.
$ emctl stop oms -all
$emctl stop agent
shutdown the database
-Listing targets of an agent:
Change directory to the AGENT_HOME/bin directory (UNIX) or the AGENT_HOME\bin directory (Windows).
$ emctl config agent listtargets
-To identify the console port assigned to the Enterprise Manager Cloud Control Console, run the following command:
$ OMS_HOME/bin/emctl status oms -details
$ omsvfy show opmn
$ omsvfy show ports
- Loggin on:
https://[oms_host_name]:[console_port]/em
Ports: often 7788, 7799
Start / Stop / Check Agent:
D:\app\oracle\agent12c\core\12.1.0.3.0\BIN> call emctl status agent
Displays much output on status etc..Mbr>
---------------------------------------------------------------
D:\app\oracle\agent12c\core\12.1.0.3.0\BIN> emctl stop agent
Oracle Enterprise Manager Cloud Control 12c Release 3
Copyright (c) 1996, 2013 Oracle Corporation. All rights reserved.
The Oracleagent12cAgent service is stopping............
The Oracleagent12cAgent service was stopped successfully.
D:\app\oracle\agent12c\core\12.1.0.3.0\BIN> emctl clearstate agent
Oracle Enterprise Manager Cloud Control 12c Release 3
Copyright (c) 1996, 2013 Oracle Corporation. All rights reserved.
EMD clearstate completed successfully
D:\app\oracle\agent12c\core\12.1.0.3.0\BIN> emctl start agent
Oracle Enterprise Manager Cloud Control 12c Release 3
Copyright (c) 1996, 2013 Oracle Corporation. All rights reserved.
The Oracleagent12cAgent service is starting.....................
The Oracleagent12cAgent service was started successfully.
D:\app\oracle\agent12c\core\12.1.0.3.0\BIN> emctl upload agent
Oracle Enterprise Manager Cloud Control 12c Release 3
Copyright (c) 1996, 2013 Oracle Corporation. All rights reserved.
---------------------------------------------------------------
EMD upload completed successfully
36. CONTAINER DATABASE AND PLUGGABLE DATABASES IN 12C:
Either with the DBCA, or SQL Statement, you can specify if you want a container Database or "classical" Database",
at the time that you create the database:
CREATE DATABASE ... ENABLE PLUGGABLE DATABASE
You can create a Container Database (CDB), which can support or hold multiple "pluggable" databases (PDB's).
Each PDB has the "look and feel" as a ordinary database.
If you do not specify the ENABLE PLUGGABLE DATABASE clause, then the newly created database
is a non-CDB (classical database like in 10g/11g, and all other previous versions).
Thus the "CDB" can be viewed as the (root) container, which can hold "PDB" containers.
This way, you can have a PDB for the sales application, or a PDB for the finance department etc..
This architecture is called the "multi-tenant environment".
Overview Architecture CDB and optional PDB's in 12cR1:

Note: Above shows the 12cR1 architecture. In higher releases,
the architecture might change to a certain extent.
So the CDB is the "container", and it can be represented by the "root" CDB$ROOT.
If the database is indeed a CDB, instead of the classical type, then we also have:
- A read-only template PDB$SEED for creating new user PDB's.
- Common users (accounts) in CDB$ROOT which in principle are valid everywhere (all PDB's).
- (local) PDB accounts only appplicable for that PDB.
- (local) PDB Administrator.
- Plugging and un-plugging a PDB at will.
- In its unplugged state, a PDB is a self-contained set of data files and an XML metadata file.
- The table definitions, index definitions, constraints etc.. and data all reside within the PDB's.
- Many techniques like plugging an existing PDB into another CDB.
The CDB has it's SYSTEM, SYSAUX, UNDO, TEMP tablespaces and datafiles, plus the controlfiles and REDO.
Each PDB has a private SYSTEM, SYSAUX, optionally TEMP, and datafile(s).
So, the UNDO, REDO and controlfiles are "global", as well as the logging facilities (alert.log),
which is "global" too.
36.1 Connecting to a PDB or CDB:
This quite the same as any former version (11g, 10g etc...):
SQL> CONN system/password@cdb1
Connected.
SQL> CONN system/password@//localhost:1521/cdb1
Connected.
SQL> SHOW CON_NAME
CDB$ROOT
When you are a common user, you can "go" to any container if you have sufficient permissions.
SQL> ALTER SESSION SET container = pdb1;
SQL> SHOW CON_NAME
PDB1
Each pluggable database registers itself a service to the listener, so the CONNECT statement works as well.
SQL> CONN system/password@pdb1
Connected.
SQL> CONN system/password@//localhost:1521/pdb1
Connected.
36.2 Metadata: