A short note on booting Unix/Linux.

Date : 14/02/2014
Version: 0.8 - New
By: Albert van der Sel
Remarks: It's a simple note about Unix/Linux boots. It might help somewhat in troubleshooting...


If you use Unix or Linux, it's important to have a "reasonable" idea about a disk based Unix/Linux boot.
It might help in reviving a system that "looks" lost.
This note is not for experts. It's only usable for "beginners/mediors" on Unix systems (i.e. HPUX/AIX/Linux)


LIMITATIONS:

=> We will consider the following target systems: HPUX Itanium / HPUX PA-RISC, LINUX, and AIX.
=> We don't consider virtualization. Only a physical machine boot. That's indeed not so good...


Chapter 1. HPUX 11i Itanium and PA-RISC:


Remarks:

This note, one way of the other, is "somehow" centered in keeping a system "up".

If availability of the system is a primary goal for you too (which likely is true), then consider this first:
  • A Service Guard Cluster (2 or more nodes) is great. Suppose one system goes down, then the packages "move" to another node.

  • Even something as "simple" as this: having Ignite and a "local tapedrive" and using the "make_tape_recovery" command, is truly a simple,
    but great option to garantee to get a system (the OS) back after a crash (only a bit of downtime is involved ofcourse).

  • Having Ignite and using the "make_net_recovery" command, is great too, but a little more complex, since it's Client/Server and needs a network.

  • The DRD (Dynamic Root Disk) is great (I think) in creating and maintaining a true alternative boot disk. Maybe one of the best options in Unix Land.

For the rest, this note is a bit of a "weird" mix of points of interest, that might be handy at times...


1.1 Exploring the "EARLY" EFI boot on Itanium:

1.1.1 Quick overview EFI boot:

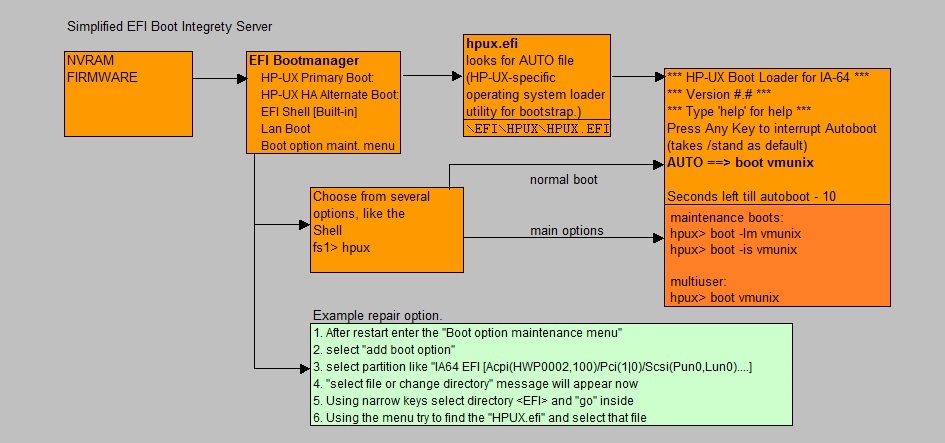
Fig 1. Illustration of the Itanium HPUX EFI boot


There could be some additional stuff to consider, if the physical machine would support a number of VM's (Virtual Machines / Virtual Partitions).
However, here we just take a look at a physical machine boot.

After Power On, the FIRMWARE/NVRAM is read, and a number of specific EFI phases takes place. Those are not important here.

A short while later. the (local) "EFI System Partition" is accessed. It contains the boot loaders for all operating systems installed.
EFI can be configured in such a way, that the System just "autoboots" to HPUX (or another OS).
So, such a bootloader (like "hpux.efi") is present on the EFI system partition. If you would choose to start HPUX, then "hpux.efi" will try
to find the HPUX kernel (typically located in "/stand)

In NVRAM, the PRIMARY bootpath and optionally an High Availability (HAA) path, and an Alternative bootpath (ALT) are stored, so that EFI
can find the bootstrap loader. For HPUX, the path to the loader is "\EFI\HPUX\HPUX.EFI", and when it starts, it reads the "\EFI\HPUX\AUTO" file
(which contains the path "/stand/vmunix") and thus it proceeds to boot HP-UX as specified in the AUTO file.
Normally, this will just be standard boot to a multi-user system.

Thus, again, the HPUX.EFI loader can find the "kernel", since the AUTO file usually contains "/stand/vmunix" (which is the HPUX kernel).

However, if you are at the console, you will have the option to interrupt the autoboot, as you may see in the right side of figure 1.

The EFI partition, is a FAT16/32 Partition with a small DOS-like "Shell" that can be started, and which then operates on objects in the EFI partition.
Among it's features are a small number of Dos/Unix like commands, like "cd", "ls" etc..
More interresting, are a set of "specialized" command, with which you can list bootoptions, change bootoptions etc..

Available too, is a "Boot Manager" which is an ascii menu driven system. It allows you to add, change, delete bootoptions.

The EFI partition contains a "directory looking-like" structure, where all "boot loaders" of all OS'ses are present in their own "directory".
Such layout may resemble something like this:

EFI System Partition
Boot loaders are stored in:
\EFI\HP\EFIDriver
\EFI\HPUX
\EFI\Redhat


1.1.2 Booting from the EFI Shell:

From the Boot manager menu, you can enter the Shell (see figure 1).

Among many other commands, the "map -r" command is quite interesting. It shows you output from which you *might* reckognize bootable devices.
This might indeed be so, if from a running HPUX system, you would once have various "ioscan" command listings saved, and now you see "familiar" paths.

Shell> map -r

fs0 : (Often complicated) Path to disk/Partition
fs1 : (Often complicated) Path to other disk/Partition
possibly other paths..

Now, let's do a regular boot:

Shell> fs0:
fs0:\> hpux

hpux:\> boot vmunix

The "hpux.efi" efi executable, will take "/stand" as the default filesystem to locate the HPUX kernel.
Indeed, on the commandline above, you could have entered another relative path.

Other bootoptions are:

boot -is vmunix booting to Single User mode.
boot -lm vmunix booting to LVM maintenance mode.
boot -lq vmunix booting without vg00 quorum restriction.


1.2 Exploring the "EARLY" PA-RISC Boot (Optional section, if your interest is Itanium only):

HPUX was well-know for running on RICS systems like HP9000 series, but later on, since 11i, it's was also ported to Itanium (Intel).
Most, somewhat older IT people, were thus very familiar with PA-RISC. Ofcourse, presently, Itanium is popular for running HPUX.

No doubt it's one of the best. However, some strange things are also true, like no virtual fs like "/procs" or sysfs.
So, while in many Unixes, many utilities just probe through "/procs" or "/sys", HPUX doesn't expose it's kernel data records to a virtual fs.

Also notable is it's high resilience in swap strain.

Alongside some other power machines, the HP "Superdome", has been one of the preferred mission critical systems at (for example) many Banks
and other Organisations, in the past (and even today, but in a lesser extend).
Many facinating details can be found elsewhere... Here, we now proceed to the boot of the traditional PA-RISC nachines.

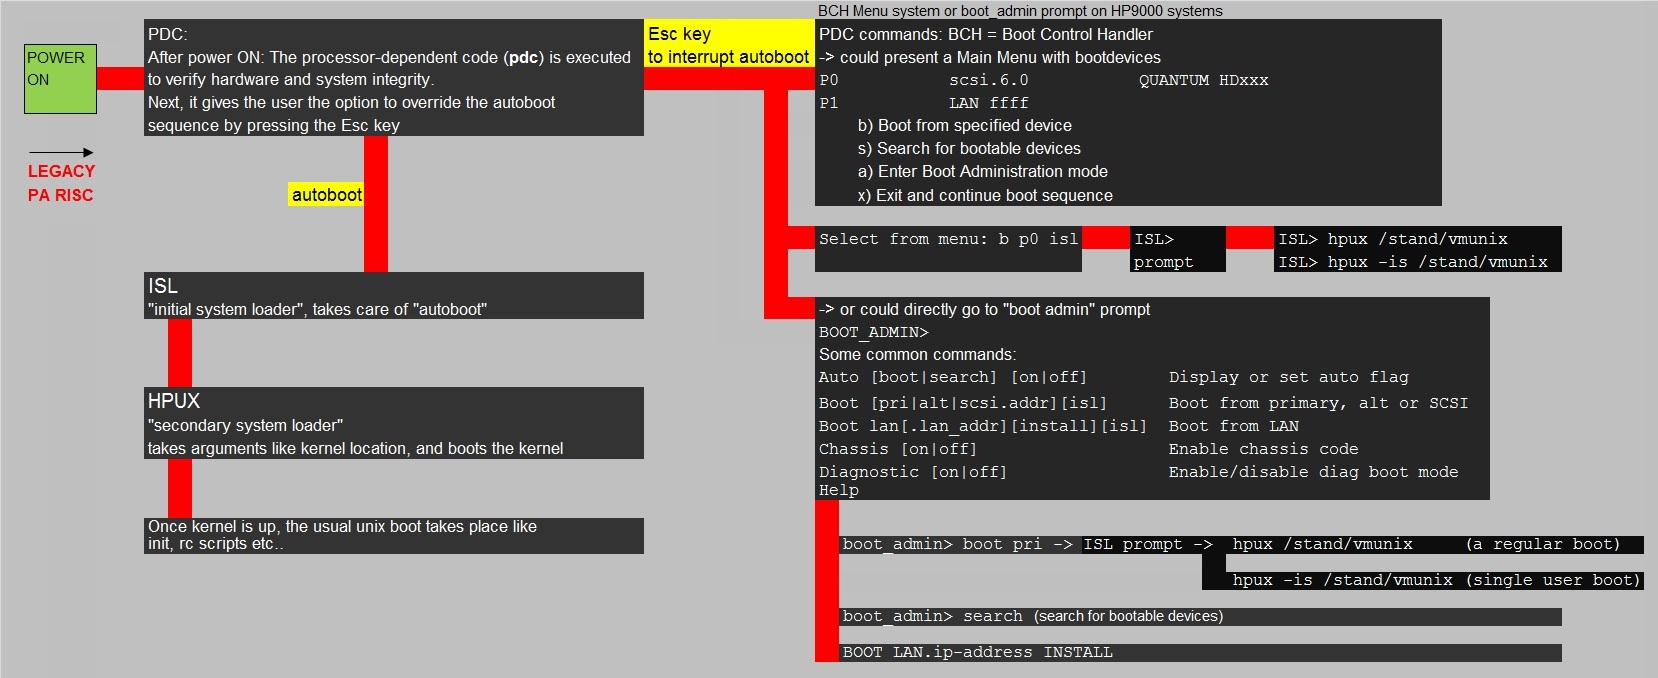
Fig 2. Illustration of the PA-RISC HPUX boot


Figure 2 may look complicated, but it's not. Take a good look at it.

=> Note that the regular "autoboot" just takes care that you will boot to HPUX.
In the figure, that's the small "stack" on the left side: "PDC->ISL->HPUX bootstrap->boot vmunix from /stand".

=> However, after the "PDC" is loaded, it gives you the choice to interrupt the "autoboot". If you do that, there are several options.

Here is a possible "sequence". Just suppose you want to boot from tape:

1. Power on the system.
2. When it prompts you for interupting the boot sequence, press any key.
3. This will lead to the "ISL>" (Initial System Loader) prompt.
4. At the "ISL>" prompt, many options are possible, like booting HPUX or, for example, "search for a device to boot from".
4. Do a search for the devices. i.e the "SEA" command.
5. Check which is a tape device (it will probably be mentioned as a Sequencial Device).
6. On the ISL Prompt, give the Command : BO (Tape device Name i.e. P1 , P2 etc.).
7. Press N for IPL.
8. It will boot from the tape.
9. Next you can select interactive or non-interactive recovery.
etc..

However, from the "ISL>" prompt, you could also just boot to HPUX, like for example in "single user" mode:

ISL> hpux -is /stand/vmunix


1.3 Bootphases after the Kernel load.

In a birds-eye view, we have a bootsequence on Itanium as desribed below.
Actually, after the kernel has loaded, the PA-RISC sequence is very similar:

Power On EFI Firmware
-> EFI System Partition is accessed
-> EFI Boot manager displays (choose an OS or shell)
-> If chosen HPUX -> [HP-UX Primary Boot: for example: 0/1/1/0.1.0 (from NVRAM)]
-> HPUX.EFI bootstrap loads. Reads the AUTO file (typically contains "/stand/vmunix")
-> HPUX.EFI will then load "/stand/vmunix" (the kernel)
-> The kernel initializes and loads modules and initializes devices/hardware paths
-> "init" starts. It reads the "/etc/inttab" file.
-> From "inittab", several specialized commands are started like "ioinit"
-> "init" reads the "run level" (default 3).
-> the "rc" execution scripts (for that run level) run from "/sbin/init.d"

The "rc scripts":

=> "Execution scripts": execute and read variables from "configuration files" (scripts)
and they run through the startup- or shutdown sequence.
These scripts live in "/sbin/init.d".

=> "Configuration variable scripts": use them to set variables or to enable or disable subsystems, or perform some other function
at the time of startup- or shutdown of the sytem.
These scripts live in "/etc/rc.config.d".


1.4 Exploring the boot volumegroup "vg00" and bootdisks

The HPUX 11i Operating System "lives" in the "vg00" Volume Group (VG), which is a diskgroup consisting of one or more physical disks.
Often, it's a mirorred disk, on the hardware level, so it will be presented to us, by HPUX, as "one" disk.
But "vg00" can consist of just one single disk (not mirrored) as well. Then, for availability reasons, we need to add another disk.

A number of standard Logical Volumes (LV's) will be present in vg00, which corresponds to the usual standard "filesystems" (like /opt, /var etc..):

LVM Device file............mount point.....size..fs type
/dev/vg00/lvol1............/stand..........1792..vxfs
/dev/vg00/lvol2............swap............8192
/dev/vg00/lvol3............/...............1024..vxfs
/dev/vg00/lvol4............/tmp............1024..vxfs
/dev/vg00/lvol5............/home...........640...vxfs
/dev/vg00/lvol6............/opt............14336.vxfs
/dev/vg00/lvol7............/usr............14336.vxfs
/dev/vg00/lvol8............/var............8704..vxfs

You should see those standard OS related LV's too, if you run the "print_manifest" command (comes from ignite), or just enter the "mount" command, or
list the contents of "/etc/fstab" which registers all mounts, like

# cat /etc/fstab

Now, let's take a look what our bootdisk is, and where lvol1 (/stand), lvol2 (swap), lvol3 (and /) are.
You can use the "lvlnboot" for that:

# lvlnboot -v

Boot Definitions for Volume Group /dev/vg00:
Physical Volumes belonging in Root Volume Group:
/dev/disk/disk55_p2 -- Boot Disk
Boot: lvol1 on: /dev/disk/disk55_p2
Root: lvol3 on: /dev/disk/disk55_p2
Swap: lvol2 on: /dev/disk/disk55_p2
Dump: lvol2 on: /dev/disk/disk55_p2, 0

Current path "/dev/dsk/c3t3d5" is an alternate link, skip.
Current path "/dev/dsk/c9t3d5" is an alternate link, skip.
Current path "/dev/dsk/c1t3d5" is an alternate link, skip.

The "lvlnboot -v" command shows us interesting stuff. It's a powerfull command, and we can prepare boot, swap, and root LVM's
using lvlnboot with different switches. We see later about that.

So, here "disk55" is the bootdisk, and the "_p2" says us that we actually now looking at the second partition.
Note that "swap" and "dump" are both on "lvol2". That is allowed, however, a seperate "dump" LV is recommended.

Note that a device file like "/dev/disk/disk55" is the *new* "agile" or "persistent" way to access LUNs/Disks.
It's better, since the traditional "/dev/dsk/cXtYdz" device file, "hardcodes" the controller (c), target (t) and LUN (d) numbers.
Although the OS will create a device file itself if needed, it's more persistent if a LUN/Disk is moved in the storage system.

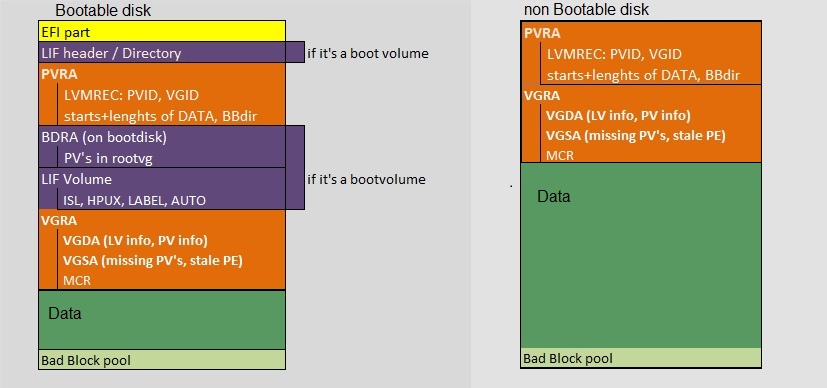
Next, let's see how a bootdisk and normal disk differentiate. Take a look at figure 3:


Fig 3. Headers in a HPUX disk (the EFI partition exists only on Itanium bootable disks)


There are lot's of different Metadata "headers", on both a bootable- and non bootable disk, like the "PVRA" area.
We will show their importance later on.
For now, let's have some special attention to the different "LIF" area's on a bootable disk.

# lifls –l /dev/rdisk/disk55_p2

starboss /dev/rdisk # lifls -l /dev/rdisk/disk55_p2
volume ISL10 data size 7984 directory size 8 08/06/27 23:56:28
filename....type...start...size...implement..created
===============================================================
ISL........-12800..584.....242.....0..........08/06/27 23:56:28
AUTO.......-12289..832.....1.......0..........08/06/27 23:56:28
HPUX.......-12928..840.....1024....0..........08/06/27 23:56:28
PAD........-12290..1864....1468....0..........08/06/27 23:56:28
LABEL......BIN.....3336....8.......0..........08/12/18 11:07:40

So, if you look at figure 3, let's concentrate on the "purple" (lif) area's.

The LIF Header/Directory, contains a list of other disks in the volume group and whether or not they are bootable.

Boot programs are stored in the boot area on the disk in Logical Interchange Format (LIF) format, which is quite like a filesystem.

There is a difference ofcourse, between PA-RISC and Itanium architectures. PA-RISC existed before Itanium, and some PA-RISC "like" terms
are still seen on Itanium, like for example "ISL".

What we often see as the start of the OS, is when the kernel loads from "/stand". However, a few phases preceed the kernel load.

In order for a disk to be bootable, the LIF volume on that disk must contain the ISL (the initial system loader)
and the HPUX ("HPUX bootstrap utility") LIF files. If the device is an LVM physical volume, the LABEL file must be present too.

=> If the VERITAS Volume Manager (VxVM) layout on the Itanium-based system architecture is used, the only relevant LIF file
is the LABEL file. All other LIF files are ignored. VxVM uses the LABEL file to determine the location of the root, stand, swap, and dump volumes.

-ISL... : initial system loader
-HPUX...: HP-UX bootstrap and installation utility
-AUTO...: defines default/automatic boot behavior
-LABEL..: used by LVM

So, if VxVM is used in vg00:

HPUX can use many file system types. Under Veritas VxVM the following is IMPORTANT:

=> If ONLY non boot related VG's use Veritas, VxVM is usually started after the operating system kernel has passed various phase.

=>If the volumes containing "/", "/stand" etc.. are under VxVM control, the boot process has a few changes compared to HFS filesystem.

If the volume containing the root file system is under VxVM control, the kernel starts VxVM modules early in the bootphase.
The LIF LABEL record in the LIF area contains information about the starting block number, and the length of the volumes that contain
the stand and root file systems and the system swap area. When a VxVM root disk is made bootable, the LIF LABEL record is initialized
with volume extent information for the stand, root, swap volumes.


1.5 Add a second disk to VG00.

This section might not be of interest right now. It may be confusing, and is not really essential for the "red line"
of this note, that is: get knowledge of what is involved in the HPUX boot.

So you might skip this one, and go to section 1.6.

As an example of working with utilities to view, and manipulate, boot structures, let's see how a bootdisk
can be added to vg00 (the bootable VG). Here we use Itanium. The procedure for PA-RISC is quite similar,
but still is different at certain steps where EFI is involved.

If you have worked a long time with PA-RISC, then on Itanium, a lot is the same, but quite a lot is different as well.
Sometimes Itanium is a bit of a "pain", although you probably strongly disagree.

If you need to add another disk to vg00 (because it is only implemented on one disk), then below is a procedure to do that on Itanium.
In some important points, it's different from PA-RISC. Note that we are building a "mirrored" disk system here.

STEPS:

1. Do you have a free disk/LUN?

There are several ways to find out if a storage device is free for our purpose. You can list all Volume Groups, and identify which disks
are already allocated for those Volume Groups.
Then, using "ioscan", you might find a disk which is not a member of any Volume Group. Anyway, be sure you take a disk which does not is a member
of any VG, or otherwise contains data (yes..., trivial remark).

So, say for example:

/dev/dsk/c2t1d0 is the sole PV for vg00.
/dev/dsk/c2t2d0 is a free disk. It's going to be a mirror for any LV on the existing disk.

Note: Actually, "c2t1d0s2" then contains "/stand", "/" etc.. That's the second partition on c2t1d0, while c2t1d0s1 contains the EFI partition.
From section 1.1, we know then that "s2" is denoted as "_p2" in the (new) agile notation. Please look again at the lvlnboot -v example in section 1.1.
there you see the newer "/dev/disk/disk55" notation, instead of "cXtYdZ" notation. However, both sorts of device files are valid in 11i v31.
You might also take a look at figure 3. The first yellow part, is the EFI partition, and "the rest" belongs to the second partion (for a boot disk).

2. Partition the new disk.

Create a text file for the "idisk" command, which will use that text file to read instructions on how to partition the disk.
The textfile below, is just a standard file you may find in nummerous other HP articles.

# vi /tmp/newdsk
3
EFI 500MB
HPUX 100%
HPSP 400MB

# idisk -wf /tmp/newdsk /dev/rdsk/c2t2d0

The "idisk" command will warn you that all data on the disk will be destroyed. Yes, we need the new partitioning, so answer "yes".

3. Let HPUX create "device files" for the partitions.

# insf -e -C disk

The "-C" tells "insf" to only rescan for the "disk class", while "-e" means that "insf" should (re-)install the special files for devices found.

4. Check the new partitioning.

# idisk /dev/rdsk/c2t2d0

"idisk" is specific for Itanium. Without any switches, like we did above, it just reads the partions, and shows them.

5. Prepare it to be a bootable LVM disk.

# pvcreate -B /dev/rdsk/c2t2d0s2

6. Write the bootfiles to "/efi/hpux/" directory in the new EFI system partition.

# mkboot -e -l /dev/rdsk/c2t2d0

-e: Use the Itanium-based system EFI layout. This option causes mkboot to copy EFI utilities from /usr/lib/efi
to the EFI partition on the disk. This option is applicable only on Itanium-based machines and it may not be used on PA-RISC.

-l: mkboot treats device as a LVM volume layout disk, regardless of whether or not it is currently set up as one.
It can be used for the VERITAS Volume Manager (VxVM) as well as the regular HPUX LVM.

7. Change the AUTO file - No LVM quorum.

# echo "boot vmunix -lq" > /tmp/AUTO.lq
# efi_cp -d /dev/rdsk/c2t2d0s1 /tmp/AUTO.lq /EFI/HPUX/AUTO

If one of both disks are broke, then the Quorum will not be met. For a VG with a certain number of member disk(s), per number of disks,
certain Quorum rules will be effective. You need a minimum number of "PVRA's" for the VG to activate. So if a disk is down, it might be
that the Quorum is too low for the VG to get alive.

Now, this step is optional, and opinions vary on how to act here. Please do further research on this subject.

The "efi_cp" executable, is a specific Itanium tool to copy file to and from an EFI partition.

8. Add the disk (or HPUX partition) to vg00.

# vgextend /dev/vg00 /dev/dsk/c2t2d0s2

9. Mirror the existing LV's on the first disk, to the second member.

# /usr/sbin/lvextend -m 1 /dev/vg00/lvol1 /dev/dsk/c2t2d0s2
# /usr/sbin/lvextend -m 1 /dev/vg00/lvol2 /dev/dsk/c2t2d0s2
# /usr/sbin/lvextend -m 1 /dev/vg00/lvol3 /dev/dsk/c2t2d0s2
# repeat for any other LV, just like was shown in the first alinea of section 1.1

10. Create LVM’s knowledge of the root, boot, primary swap and dump on the alternate disks.

# /usr/sbin/lvlnboot -b /dev/vg00/lvol1 #boot
# /usr/sbin/lvlnboot -r /dev/vg00/lvol3 #root
# /usr/sbin/lvlnboot -s /dev/vg00/lvol2 #swap
# /usr/sbin/lvlnboot -d /dev/vg00/lvol2 #dump, here swap is dump too
# /usr/sbin/lvlnboot -R

11. Concluding Steps.

=> Put the second disk as an alternative in "/etc/bootconf":

# vi /stand/bootconf

l /dev/dsk/c2t1d0s2
l /dev/dsk/c2t2d0s2

The "l" means that the devices are under LVM or Veritas control.

When using the agile notation, you might see (or add) an entry like "l /dev/disk/disk18_p2".

=> Update the EFI Boot Manager:

# setboot -p [harware_path_primary_disk]
# setboot -h [hardware_path_mirror_disk]
# setboot -b on

Now, a question remains. How does one find the correct Hardware path?
Since this is so very important, namely to correctly find, and to be able to interpret the Hardware Path, section 1.7 will be reserved for that subject.


1.6 Recommendations for documenting your system (and working with important commands.)

Following list of commands, are very instructive, and may serve to "document" your system.
If you have a HPUX machine to "play" with, run them, and take a good look at what you see. And, why would you not copy/paste
the output in some document (notepad, or ms-word etc..)?

1. Get machine information:

The following commands show detailed information about the machine "characteristics",
like Firmware level, type of machine, the model, Serial number etc...

# machinfo

# model

The following commands show "some"information about the serial number of the machine, the OS version.

# getconf MACHINE_SERIAL

# uname -a

If you have Ignite, then the "print_manifest" command is likely to be found in "/opt/ignite/bin".
This command produces an amazing (!) amount of output, just about everything of your machine.
Just run it, and pipe the output to a txt file, and save it somewhere in your documentation library.

# cd /opt/ignite/bin
# print_manifest > /tmp/all.txt

2. Get kernel paramters / list module information:

It's really recommended to have a printout of the running kernel parameters, as well as a printout of loaded modules.
Just run the following commands to obtain that information.

=> Kernel params:

# kctune

# cat /stand/system

=> Loaded modules:

# kcmodule

3. Get device information:

You probably want to have some output on devices, the hardware paths, the LUNs the system uses etc..
The "ioscan" command is perfect for that job. Note that the ioscan can use many switches, which all effect the objects
that are scanned and the sort of output that is being produced (see also "man ioscan").

Here are a few good examples, for just "reading" IO device info. Most importantly, you want to see LUNs/Disks and Hardware Paths.

=>Disk related:

# ioscan -C disk

# ioscan -efunC disk

=> List all usable IO devices:

# ioscan -u

Notes:
1. "-C" determines which class of devices you want to view.
2. "-N" determines if you want the "agile" view of devices.
3. Take some care: with some switches, you can alter the IO state, like forcefully loading/binding drivers etc..
Study the command well, before you experiment.

4. swap information:

# swapinfo -a

# swapinfo -tam

5. Boot environment:

(1): First en foremost: the "setboot" without switches, is very instructive. It shows you the primary bootpath and any optional
alternative bootpaths. So, it gives you immediate insight on how the system will boot.

=> Show the bootpath(s)

# setboot

(2): Secondly: you might be interrested in the LV information of the LV's of root, boot, swap and dump, and on which device
they are installed. You can use the "lvlnboot -v" command for that purpose.

Be very carefull in using other switches: lvlnboot can also be used to prepare those area's, and that's NOT what you want right now.

=> Show the logical volumes root, boot, swap, dump

# lvlnboot -v

(3): Thirdly: take a look at the contents of the "/stand/bootconf" file. This is an ascii file, so you can view it using
the "cat" command.
This file is not so much used "at boot time", but it's for the kernel to check bootvolumes if an update to boot programs is initiated.

# cat /stand/bootconf

(4): Fourth: the "lifls" command we have seen before as well. Use "lifls -l" on the second partition of a bootable volume,
like for example:

# lifls -l /dev/rdisk/disk55_p2
# lifls -l /dev/rdsk/c0t1d0s2

(5): Fifth: there are ways (on Itanium) to see the EFI partions. You can use the "efi_ls" utility for that.
Ofcourse, you need the "s1" partition of a bootable disk.

# efi_ls -d /dev/rdsk/c1t4d0s1

(6): Sixth: Also from "dmesg", or "syslog.log", it's possible to get info from what was the "Boot device" from the last boot:

# /var/adm/syslog # cat syslog.log | grep -i "Boot device"

There are still some other items to check out (which relate too the boot), like "/etc/inittab", but they are dealth with in other sections.

6. Local Account and Group information:

=> User- and Group information:

I think it's quite sane to have a current list of user accounts and group accounts, together with their "security id's".
You never know when that becomes "handy".
Especially having the "user id's" (UID's) and "group id's" (GID's) is important.

This is all about local accounts ofcourse.

# cat /etc/passwd

# cat /etc/groups


Needless to say that you can put this info (and all other sorts of output) to a txt file, using " > yourfile".

=> Scheduled Tasks - crontab:

Accounts, like "root" and accounts that "owns" applications, often have scheduled jobs using "cron", which is the default schedular in Unix.
To view scheduled tasks, use the "crontab -l" command, which will only display the jobs and their schedule.

# crontab -l


7. init:

=> inittab file:

After the "kernel" and essential modules have loaded, then early in the rest of the bootphase, "init" will start, and the "rc" scripts
will run. For "ïnit", the "/etc/inittab" file is most important. That's why a listing cannot hurt at all.

# cat /etc/inittab

8. Network parameters and configuration files:

There are lots of config files that have an effect on your network configuration. Also, there are quite a few commands
which shows you all sorts of notable info.

I suggest that you just try the commands below. Study the output carefully. Some commands just list the contents
of some config file (the "cat" commands), while others start a "utility", which just produces output.
Also, watch the output closely, on network interfaces identifiers like "lan0" etc..

Here they are....

# lanscan

# for i in `lanscan -i | awk '{print $1}'` ; do ifconfig $i ; done

# ifconfig lan0 # If you indeed have a lan0 interface. See the output of "lanscan".

# ioscan -fnC lan

# cat /etc/hosts

# cat /etc/resolv.conf

# cat /etc/inetd.conf

# cat /etc/netconfig

# cat /etc/rc.config.d/netconf

9. Filesystem and LVM information:

=> Filesystems:

First and foremost, list the contents of "/etc/fstab" which registers your standard filesystems that should mount at boottime:

# cat /etc/fstab

Next, use the "bdf" command to list the filesystems, the devices, and current free/used space on those filesystems.
Alright, it looks a lot similar to the former listing. But actually, its another view if you watch closely.

# bdf

=> LVM information:

Next, we want to have basic information from the LVM implementation of the system.
This means that we want info on "Volume Groups" (VG), the "Logical Volumes" (LV) on those Volume Groups,
and which "Phyical Volumes" (PV) (or disks/LUNs) are member of those Volume Groups.

--> Get a listing of all VG's with elementary information:

# vgdisplay

--> Get a detailed listing of this particular VG (here VGNAME can be obtained from the former listing):

# vgdisplay -v VGNAME

Note that LV information is displayed as well.

There are quite a few other informative commands.

- Try to find out what you can see with "diskinfo" command. You can use it like for example:

# diskinfo /dev/rdsk/c31t1d3

- To find disk or LUN information, like lunpaths and hardware paths, the "ioscan" command produces great output, like for example:

# ioscan -efunC disk

# ioscan -fkNC lunpath

- Try to find out what you can see with the "lvdisplay" command.

As a different angle to this, let's try some "ordinary" "ls" listings in "/dev". You know that all devices are accessible
through "device files". So let's try a few "ls" listings in dev, like so:

# cd /dev/vg00
# ls –al

# cd /dev
# ls -al disk*


1.7 Hardware Paths.

1.7.1 Local HW paths (cell/sba/lba/device)

Everyting has a "full" path or "fully qualified name" to make it unique. Some examples:

- For example, in DNS: Server "acdc" is unique because there we actually have Server "acdc.rd.antapex.org".
Now, there may exist another Server with a host name "acdc", but it better be in another domain, like "acdc.hardrock.com".

- Host adress "55" is better qualified by address "202.12.37.55" since we now know it lives in the network "202.12.37".

- If you say: I live at "Rembrandt street, 55", then it's not good enough, because there maybe thousends of streets namedt "Rembrandt", all over the World.
But if you say "Rembrandt street, 55, Amsterdam, Holland", then it's unique.

With computer hardware, it's the same. To reach a certain device from the Main Board,
considering all switches over IO buses, bridges, Controller cards... you may characterize that path with something like "0/1/1/2/0.1.2"
It is a sort of a "route" to the destination...

Now, if I go to a HPUX 11i v23 machine, and try the "lvlnboot -v" command again (you have seen it before in section 1.1);

# lvlnboot –v

Boot Definitions for Volume Group /dev/vg00:
Physical Volumes belonging in Root Volume Group:
/dev/dsk/c0t5d0 (0/0/0/3/0.5.0) -- Boot Disk
Boot: lvol1 on: /dev/dsk/c0t5d0
Root: lvol3 on: /dev/dsk/c0t5d0
Swap: lvol2 on: /dev/dsk/c0t5d0
Dump: lvol2 on: /dev/dsk/c0t5d0, 0

Notice the path "0/0/0/3/0.5.0", printed in bold in the output above. It's the hardware path (HW Path) to disk or LUN "c0t5d0".

To explain it, the HW Path is like:

CELL => SBA => LBA => DEVICE

or, notated this way:

Cell/SBA/LBA/Device

Where

-"CELL" is the "cpu unit / board" (the "System" so to speak.).
- SBA is the System Bus Adapter (the main IO bus of the System)
- LBA is a Local Bus Adapter (an offspring Bus of SBA)
- Device could be for example an FC HBA card.

In general, a SBA may have multiple LBA's. A LBA may have multiple devices.
If you do not have "hard partitions", then your system is CELL 0.


1.7.2 Long paths: Older "zoned" LUN Hardware paths:

For true internal devices, a hardware path is shorter, like for example "0/0/0/3/0.5.0", which might be an internal disk.
The "x/y/z/w" stuff, represents the internal "Cell/SBA/LBA/Device" part of the hardware path. Next, the ".a.b.c" part, often represents
a path to a device, like to a LUN on a local SCSI bus.

However, if you do an "ioscan" listing, you most often see longer strings. These long paths often are associated with (remote) external devices
like for example LUNs exposed from a SAN. Take a look at the following example:

Listing 1.

[starboss]# ioscan -efunC disk

(Only partial output...)

Class..Instance...HW Path
disk...21.........0/3/0/0/0/0.2.4.0.0.0.2...sdisk...CLAIMED.../dev/dsk/c1t0d2../dev/rdsk/c1t0d2
disk...22.........0/3/0/0/0/0.2.4.0.0.0.3...sdisk...CLAIMED.../dev/dsk/c1t0d3../dev/rdsk/c1t0d3
etc..

The first (internal) part, seperated by slashes, represents the path to (for example) the internal HBA card.
The second part, seperated by dots, represents the path in the fiber network, like the Domain (Switch), port, and the virtual SCSI bus.

So, suppose we have the string: "0/3/1/0/4/0.1.3.0.0.2.3":

Then, in the old Legacy view, it could be due to this:

"0/3/1/0/4/0" is "Cell/SBA/LBA/Device/" part, all the way to the internal HBA (FC) card.
Then follows the path through the fiber network, all the way to the LUN in the array. In some older "interpretations", it means:

- HBA/Interface card ("0/3/1/0/4/0")
- Domain (~switch number)
- Area (physical port number)
- Port (always 0 in a switched fabric)
- Virtual SCSI Bus
- SCSI target
- SCSI LUN

In this idea, we would have that the path "0/3/1/0/4/0.domain.area.port.bus.target.lun", which in this case equals "0/3/1/0/4/0.1.3.0.0.2.3"
But do not take this as a "universal truth", since there are quite a few different topologies and components, which have a different way
on how you would construct such a path.

Also, such a view is a "Legacy view" in HPUX lower than 11iv3. Below we will see that the modern way, that is, in the 11iv3 "lunpath" view,
that it will show WWN identifiers.

For the "domain.area.port.bus.target.lun" stuff, again, never interpret that too literally. It's a "zoned" view using switches and area's.
The topology, the sort of swiches, the ports on the SAN, will all have influence on how correctly interpret it.

For the "architectures" that allow it, a convienient way to "compactify" the "Domain.Area.Port" part, is in using the "N_port_id".
In such a case, the nport id "looks like" the "Domain.Area.Port" string, but it's not.
However, N port id's actually sources from "virtualization" where a physical port may register multiple virtual WWPN's

Actually, as we will see soon, it only matters that the WWPN of a HBA port, talks to the WWPN of a SAN target, independent of the
infrastructure that connects them. Since the fiber is shared as well, virtual paths are constructed, where multiple WWPN's are registerd at the SAN side,
so that multiple Unix Hosts with their unique WWPN's, communicate with corresponding WWPN's registerd at the SAN, so they can find their own LUNs.

In general, from the two example paths in Listing 1 above, do not immediately conclude that two seperate disks (LUNs) are listed.
No, since usually, for High Availability reasons, there are two or four (or more) "paths" (through the fiber network, or controllers) to one and the same LUN,
you often see 2 or 4 lines in such output actually describing "paths" to one and the same disk.
In the example above however, these paths happens to be paths to different LUN's. That would also be suggested from the ending "2" and "3".

In general, depending on the infrastructure, you might get several lines to one and the same disk.
So, having a Host using several SAN based LUNs, the "ioscan" output might be quite a long listing.

One common "High Available" setup, is to have 2 HBA cards in the Host, where also "multipathing" is enabled. Those HBA cards
then ultimately are connected to two different Controllers on the SAN. So, you might then end up with 4 paths to one LUN.
Now, very specific details can only be obtained from a Storage Admin: you need to see "the picture"
including the SAN switches and Storage arrays.

You might say: Nowadays the theory of this section does not apply anymore. A more accurate description follows in the next section.

1.7.3 Modern view: SAN "LUN Paths" using WWID's/WWPN's:

A modern way to view diskpaths to LUNs, is the following:
  • Every "device" like a HBA (on a Host), or SAN controller, has it's unique WWNN (Word Wide Node Number).
  • But, a device might have one, or even multiple "ports". That's why a associated to the device's WWNN, each port
    has it's derived WWPN (Word Wide Port Number).
  • A SAN controller/filer (managing diskarrays) has a WWNN, and it has one or more ports too, each with it's on WWPN.
  • Ultimately, traffic goes from WWPN to WWPN (Host to/from SAN) with optional switches in between.
You can see the WWPN's on the SAN port that leads your LUNs, by using the "ioscan" command with the "lunpath" class.
Also, I find it more easy to identify different LUNs from such type of listing. Here is an example:

Listing 2.

[starboss]# ioscan -fkNC lunpath

(Only partial output...)

lunpath..24..0/3/0/0/0/0.0x50001fe15012d508.0x4001000000000000..eslpt..CLAIMED...LUN path for disk15
lunpath..21..0/3/0/0/0/0.0x50001fe15012d50c.0x4001000000000000..eslpt..CLAIMED...LUN path for disk15
lunpath..30..0/3/0/0/0/1.0x50001fe15012d509.0x4001000000000000..eslpt..CLAIMED...LUN path for disk15
lunpath..27..0/3/0/0/0/1.0x50001fe15012d50d.0x4001000000000000..eslpt..CLAIMED...LUN path for disk15

lunpath..25..0/3/0/0/0/0.0x50001fe15012d508.0x4002000000000000..eslpt..CLAIMED...LUN path for disk16
lunpath..22..0/3/0/0/0/0.0x50001fe15012d50c.0x4002000000000000..eslpt..CLAIMED...LUN path for disk16
lunpath..28..0/3/0/0/0/1.0x50001fe15012d50d.0x4002000000000000..eslpt..CLAIMED...LUN path for disk16
lunpath..31..0/3/0/0/0/1.0x50001fe15012d509.0x4002000000000000..eslpt..CLAIMED...LUN path for disk16
etc..

In this listing, disk15 and disk16 are really two different LUNs.

Take a look at disk15. Do you notice that there are two lines having "0/3/0/0/0/0", and two lines having "0/3/0/0/0/1"
in the paths to disk15. What do you think that means? Indeed, It should correspond to two HBA's in our HPUX Host.

For the same listing as above (disk15 & disk16), it's instructive to obtain the Legacy output too, using:

Listing 3.

[starboss]# ioscan -efunC disk

(Only partial output...)

Class..Instance...HW Path
disk...21.........0/3/0/0/0/0.2.4.0.0.0.2....sdisk.../dev/dsk/c1t0d2../dev/rdsk/c1t0d2
..................Acpi(HPQ0002,PNP0A08,300)/Pci(0|0)/Pci(0|0)/Fibre(WWN50001FE15012D508,Lun4002000000000000)
disk...14.........0/3/0/0/0/0.2.6.0.0.0.2....sdisk.../dev/dsk/c3t0d2../dev/rdsk/c3t0d2
..................Acpi(HPQ0002,PNP0A08,300)/Pci(0|0)/Pci(0|0)/Fibre(WWN50001FE15012D50C,Lun4002000000000000)
disk...27.........0/3/0/0/0/1.102.4.0.0.0.2..sdisk.../dev/dsk/c9t0d2../dev/rdsk/c9t0d2
..................Acpi(HPQ0002,PNP0A08,300)/Pci(0|0)/Pci(0|1)/Fibre(WWN50001FE15012D509,Lun4002000000000000)
disk...24.........0/3/0/0/0/1.102.6.0.0.0.2..sdisk.../dev/dsk/c11t0d2../dev/rdsk/c11t0d2
..................Acpi(HPQ0002,PNP0A08,300)/Pci(0|0)/Pci(0|1)/Fibre(WWN50001FE15012D50D,Lun4002000000000000)

disk...15.........0/3/0/0/0/0.2.6.0.0.0.3....sdisk.../dev/dsk/c3t0d3../dev/rdsk/c3t0d3
..................Acpi(HPQ0002,PNP0A08,300)/Pci(0|0)/Pci(0|0)/Fibre(WWN50001FE15012D50C,Lun4003000000000000)
disk...22.........0/3/0/0/0/0.2.4.0.0.0.3....sdisk.../dev/dsk/c1t0d3../dev/rdsk/c1t0d3
..................Acpi(HPQ0002,PNP0A08,300)/Pci(0|0)/Pci(0|0)/Fibre(WWN50001FE15012D508,Lun4003000000000000)
disk...28.........0/3/0/0/0/1.102.4.0.0.0.3..sdisk.../dev/dsk/c9t0d3../dev/rdsk/c9t0d3
..................Acpi(HPQ0002,PNP0A08,300)/Pci(0|0)/Pci(0|1)/Fibre(WWN50001FE15012D509,Lun4003000000000000)
disk...25.........0/3/0/0/0/1.102.6.0.0.0.3..sdisk.../dev/dsk/c11t0d3../dev/rdsk/c11t0d3
..................Acpi(HPQ0002,PNP0A08,300)/Pci(0|0)/Pci(0|1)/Fibre(WWN50001FE15012D50D,Lun4003000000000000)

The listings "Listing 2" and "Listing 3", are on the same two LUNs, although from different persepctives.
Note that listing 2 is quite clear. Here you see 4 lunpaths to the same disk, for example 4 paths to "disk15".
Here you see the 4 (virtual) WWPN's too. One WWPN per lunpath.


1.8 Very "lightweight" and very limited note on using Ignite-UX.

First, do not underestimate the simplicity of the "make_tape_recovery" command !

Using this command, you can create an operating system recovery image on a bootable recovery tape.
This command works on any system that has a local tape drive and Ignite-UX installed.
Actually, it's brilliant. And there are hardly any "difficult" dependencies and requirements. It's all "local".
So, this is definitely a recommendation from Albert ! Or even better: use DRD. But we are not going to explore those easy paths.

Contrary, this section is about a LAN based recovery/reinstall using an Ignite restore, with a Remote Ignite Server.

IGNITE:

Typically, an "Ignite Server" is installed onto a HPUX system. This means that a bundle of packages gets installed there, and
this Server may perform Ignite tasks, and all sorts of other tasks as well (just like any other Server does).

Using the Ignite Server, clients may be installed with HPUX, or a system recovery of a crashed system may be performed.
The latter task is of interest here.

HP-UX installation and recovery is done using the Ignite-UX "install environment". It's a small subset of the HP-UX OS, transferred to the memory
of the client, and which allows HP-UX to install itself onto a system. During the initial phases of installation and recovery,
it runs in client memory without any disk-based storage. A memory-based RAM disk holds the initial root file system needed for HP-UX operation.
During the process, the correct disks are identified, and volumes and file systems are created. So, at a certain point, the install environment
then switches to a disk-based file system.

The Installation and Administration of Ignite-UX is certainly not trivial. The Admin manual is well over 200 pages,
and tells you everything you need yo know. Still, it's quite an effort to master it.

The "Ignite Server" is the core machine, and it will store OS backups of clients on it's disks.

In case of a crash of a client, then at the client, the EFI Boot Manager provides the means to perform a "LAN boot", in which case you are
able to specify the Ignite Server to boot from.

Per default, at the Server, the client OS archives are stored in "/var/opt/ignite/recovery/archives/[hostname]".

While installing Ignite, you are also supposed to create "depots" for all "Operating Environments" (OE), that is,
storing the files of the Operating Systems, that your clients will use.

Is Ignite-UX installed on your Server?

For this, you can use the "swlist" utility:

# swlist -l bundle | grep Ignite

IGNITE ...........C.7.7.98....HP-UX Installation Utilities (Ignite-UX)
Ignite-UX-11-23...C.7.7.98....HP-UX Installation Utilities for Installing 11.23 Systems
Ignite-UX-11-31...C.7.7.98....HP-UX Installation Utilities for Installing 11.31 Systems


Important directories:

Client Install and Recovery configuration files in: /var/opt/ignite/clients (at the Server)
Backup archives are in: /var/opt/ignite/recovery/archives/[hostname] (at the Server)
"make_net_recovery" and other commands in: /opt/ignite/bin (at the Client and Server)


How would an Installation of Ignite-UX start?:

To install Ignite-UX, you can use the "swinstall" utility. However, it's advisable (or mandatory) to go through the requirements first
(like required free diskspace in /var and /opt) and getting a good idea about what the installation will do on your system.
So, reading the install section of the manual, is totally "un-escapable". And, there are a couple of post-installation actions.

Howvever, suppose you have Ignite on DVD media, and mounted the DVD as "/dvdrom", then usually the setup would start with:

# swinstall -s /dvdrom Ignite-UX

After that, you are not done yet! Now you are supposed to create "depots" and perform some other actions, like registering clients
at the Ignite Server.

To use the Ignite-UX admin utility:

At the Server, you can start the "Admin utility" ("/opt/ignite/bin/ignite") in GUI, or text based mode.
Try the GUI first (if it can't load, then in will fall back to text mode).

# export DISPLAY=[your IP]:0.0
# /opt/ignite/bin/ignite

To create a client OS Archive or Backup:

For this, at the client, use the "make_net_recovery" command, like for example:

# make_net_recovery -s starboss p -a starboss:/var/opt/ignite/recovery/archives/$(hostname) -v -A -x inc_entire=vg00

Where:

-s: The Ignite-UX Server
-a: The directory to store the backup on the Ignite Server.
-p: Previews the processing that would take place without actually creating the archive.
-v: Display verbose progress messages while creating the system recovery archive.
-x :inc_entire=disk|vg_name

The -x means that you can say that you want all (or most) of the VG "vg00", or from a selected disk of vg00.
Otherwise the backup will contain all critical files to rebuild the OS again, but not all LV's will be backupped.

Restore a client OS Archive or Backup from an Ignite Server:

You need to boot to the "EFI boot manager" and choose the "EFI Shell". See also figure 1 in section 1.1.
A lot of details needs to be in place at the Ignite Server, like a configuration file that registers the MAC addresses of the clients.
As you see, more study is neccessary to get the details straight.

Furthermore, in theory, the client and the Ignite Server must be on the same subnet. However, some articles have shown that
this latter requirement can be bypassed.

When all conditions are in place, one way to boot the client from the EFI shell, is like in the following example:

Shell> lanboot select -cip YourIpAddress -sip 192.168.16.1 -m 255.255.255.0 -b /opt/ignite/boot/nbp.efi

Often, a "boot profile" is created using the "dbprofile" command.

In the lanboot command above:

-cip: is the client IP.
-sip: is the Server IP.
-nbp.efi: is the "bootloader" as downloaded from the Ignite Server.

In the command above, a small subset of the HP-UX OS is transferred to the memory of the client, and which allows HP-UX to install itself
onto a system. During the initial phases of recovery, the Ignite Server knows where the "make_net_recovery" backup is located.
This backup contains a tar or pax (or other backup) of vg00, and information of all backupped logical volumes on vg00.

Due to the client/Server communication, the netcard address (MAC or LLA) of the client is known, which makes it easy for the Server
to identify the correct backup (among possible backups of other clients).
The listings of locations below, illustrates the process a bit. Here, we have a "make_net_recovery" backup of client "starboss",
located on the Ignite Server "IGNSERVER".

- Registration of clients by MAC or LLA address:

IGNSERVER /var/opt/ignite/clients:> ls -al

drwxr-xr-x..4 bin....bin.....8192 Jan 17 08:28 0x00215AF86572
drwxr-xr-x..3 bin....bin.....8192 Jan 14 07:58 0x001CC4FB7F59
lrwxr-xr-x..1 bin....bin.......14 Jan 17 08:28 goofy -> 0x00215AF86572
lrwxr-xr-x..1 bin....bin.......14 Jan 14 07:58 starboss -> 0x001CC4FB7F59

- Lets see what is in 0x001CC4FB7F59:

IGNSERVER /var/opt/ignite/clients/0x001CC4FB7F59/recovery:> ls -al

-rw-r--r--..1 bin...sys.....288 Jan 14 09:46 client_status
lrwxr-xr-x..1 bin...bin......16 Jan 14 07:58 latest -> 2014-01-14,07:58

Above, we see a link "latest" to -> "2014-01-14,07:58".
Now, lets take a look at these directories:

IGNSERVER /var/opt/ignite/recovery/archives:> ls -al

drwxrwxr-x..2 bin...sys.....96 Jan 17 08:28 goofy
drwxrwxr-x..2 bin...sys.....96 Jan 14 07:58 starboss

IGNSERVER /var/opt/ignite/recovery/archives/starboss:> ls -al

-rw-------..1 bin...sys.....10230337366 Jan 14 11:14 2014-01-14,07:58


Ofcourse, the explanation in this section, is less than the bare minimum. But at least it provided you some conceptual information,
if you were indeed new to Ignite.


1.9 Overview of Important "Service Guard cluster" commands, the logs, and configfiles.

I already had a seperate note in place that describes the config files, logfiles, and commands, dealing on "Service Guard".
If this is of interrest to you, then take a look at this note.


1.10 A few examples on handling LVM errors on 11i Itanium.

Almost all errors (LVM related, or otherwise) are recorded in "/var/adm/syslog/syslog.log" logfile.
So, if you "cat", or "tail" this one, you will be informed of any error on your HPUX 11i system.

Common Error 1: From an error, not showing the device, find the device file, and disk.

LVM Error messages, do not always show you the device file name involved.
For example:

Asynchronous write failed on LUN (dev=0x3000013) IO details : blkno : 1335, sector no : 123

In order to find the device file, and which physical disk (or LUN) this is about, try the following approach.

# ll /dev/*dsk | grep 000013

brw-r----- 1 bin sys.....3 0x000013 Jun 11 14:11 disk22
crw-r----- 1 bin sys....23 0x000013 Jun 11 14:11 disk22

# pvdisplay /dev/disk/disk22 | grep "VG Name"

VG Name /dev/oravg

# strings /etc/lvmtab

The error only had some reference to a major/minor device number. At least now, we know the disk/LUN, and which VG is involved.


Ok, this is "it" for as far as HPUX goes in this note. Next, let's see about Linux, and when that is done, we go to AIX.


Chapter 2. LINUX (FEDORA/RedHat family - Fedora/RedHat/Centos):


If we think about Linux, we immediately think of Unix versions for the Intel platform.

There are handfull of Linux "kernels", but the number of different Linux Distributions (brands) is incredable.
The following link will show you an older figure of the main strains of Distributions.

Main Distributions.

A Linux distribution is "the Kernel" (or slightly modified kernel) accompanied with large collection of
open-source software and modules. The way to package and maintain those software modules, is a characteristic of the Distro too.
Also, some are more involved in Graphics, while others are more involved in supporting Business like Servers.
For about the latter types: these are then not "free", and you can buy one, including "Support" from such a manufacturer (e.g. RedHat).

Since all the sources of the Kernel and accompanying software is (in priciple) "open source", all sorts of variations exists.
However, the Linux Kernel is often a stable form of the "standard version", although modifications are done too.

Really different Linux kernels exist too, like for example used in "Real Time" Linux.

Linux is not the only Unix-like OS on Intel. One other important type is "FreeBSD". It's remarkable how many other OS'ses
are based on some modification of FreeBSD, like for example "Ontap" used in NetApp storage filers.

Last but not least: It's not only Intel. Many mainframes and midrange systems, run Linux (like Redhat, Suse) in Virtual Machines.


2.1 Exploring the "EARLY" MBR boot on Intel:


Chapter 3. AIX (v4/5/6):